
Settings
As you read through this document, you will notice recommended setting for Zoom listed as “Default On” or “Default Off”. These settings can be changed by you depending on what you prefer. Other settings are locked and cannot be changed.
To change or view any of the settings you will need to be signed into the Zoom Dashboard (Zoom Desktop App).
To do this select the Zoom shortcut on your desktop or find the program under your Start Menu button.

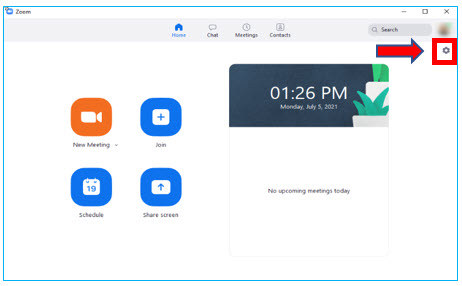
The Zoom Dashboard should now appear, as shown below. Select the Settings Icon (Gear wheel) on the top right to access the settings window.
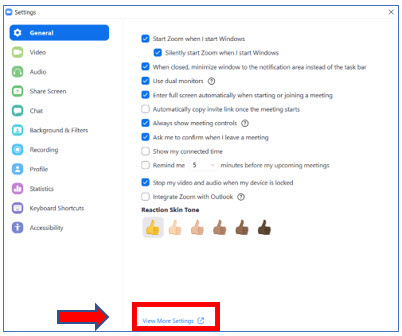
The following window should appear. Click on View More Settings.
(If you are not logged into the portal you will be prompted to at this point in time.)
Note:
- These are the recommended settings but can be changed as per your preference.
- Dual monitors are optional for work flow. Participant video and screen shared content will be on separate screens if this option is selected.
- For low connectivity, turn off video when sharing content.
Meeting Section
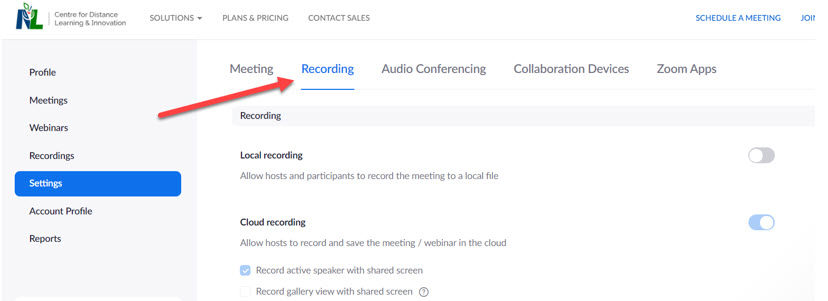
The Zoom Dashboard should have stayed open, you will have to move it out of the way or close it. You should now also see the web-based settings window (it may be hidden behind another window). This window will allow you to access more setting options than the window above (The Dashboard). The following screen should appear in a browser.
Click on the Meeting tab as shown below:

The following meeting settings are suggested to help make your experience and that of your students as smooth as possible.
Under the Security heading in the Meeting Section there are two main options that we are concerned with: Waiting Room is at the top of this section and Meeting Authentication Options is about 8 down in the list.
- Waiting Room → Off by default. Otherwise you will have to admit every student, one at a time. This can be time consuming.
- Embed passcode in invite link for one-click join → Leave on.
- Only authenticated users can join meetings → Leave on
Schedule Meeting
This is for creating a meeting outside of Brightspace.
Keep scrolling down and you will see the heading.
Only one setting to note here.
- Audio Type → Computer Audio (Don’t forget to click Save). If it was already selected the save button will not appear.
In Meeting (Basic)
Keep scrolling down and you will see the heading.
There are a lot of options in this area.
- Chat → Default On (If you check the box for “Prevent participants from saving chat” then you cannot Auto save chats)
- Private Chat → Default Off (If you do not want students to chat privately with each other.) Hosts are unable to see private chats.
- Auto Save Chats → Default On
- Sound Notifications → Default Off (everyone) (This setting is up to individual teachers.)
- File Transfer → Default On (Be aware that students can send files this way!)
- Feedback to Zoom → Default Off
- Display end-of-meeting experience feedback survey → Default off
- Co-host → Default On
- Meeting Polls → Default On
- Always show meeting control toolbar → Default On
- Show Zoom windows during screen share → Default Off
- Screen Sharing → Default On
- Who can share → Your choice, but be aware of students sharing.
- Who can start sharing when someone else is sharing? → Host Only
- Disable Desktop/screen share for users → Default Off
- Annotations → Default On (Both options boxes checked.)
- Whiteboard → Default On (Allow saving, uncheck auto save.)
- Remote Control → Default Off
- Non-Verbal Feedback → Locked On
- Meeting Reactions → Locked On
- Allow removed participants to rejoin → Default On
- Allow Participants to rename themselves → Locked Off
- Hide Participant profile Pictures in a meeting → Default Off
In Meetings (Advanced)
Keep scrolling down and you will see the heading.
The options are listed below.
- Report to Zoom → Default On
- Breakout Room → Default On (Allow host to assign participants to breakout rooms when scheduling.)
- Remote Support → Default Off (* for teachers to experiment with)
- Closed Captioning → Default On
- Save Captions → Default On
- Language Interpretation → Default Off
- Far end camera control → Default Off
- Virtual Background → Default On
- Video Filters → Default On
- Immersive View → Default On
- Identify Guest participants → Default On
- Auto-Answer Group in chat → Default On
- Allow Users to select stereo audio in their client settings → Default On
- Show a "Join from your browser" link → Default On
- Show "Always join from browser" option when joining from join.zoom.us → Default Off
- All other options DISABLE IN THIS SECTION
- Request permission to unmute → Default Off
Email Notification
Keep scrolling down and you will see the heading.
The options are listed below.
- When a cloud recording is available → Default Off (which of the two options should be selected:
- Send a copy to the person who scheduled the meeting/webinar for the host
- Send a copy to the Alternative Hosts ask dale
- When attendee join meeting before host → Default Off
- When a meeting is cancelled → Default Off
- When an alternative host is set or removed from a meeting → Default Off
- When someone scheduled a meeting for a host → Default Off
- When the cloud recording is going to be permanently deleted from trash → Default On
- Blur snapshot on iOS app switcher → Default Off
Recording Options
In order to see the recording options you will need to scroll to the top of the page and click on the Recording tab as shown below:
Allow cloud recording sharing
- Allow cloud recording sharing → Default Off
Automatic Recording
- Record Meetings Automatically → Default Off
Others left at default.