
Learning Resources
Lesson
Cel is short for celluloid, an early clear plastic material used to draw and paint the individual frames of animation. Cel animation is a technique for presenting a series of images with incremental changes in them at a rate of speed that gives the illusion of movement. It is the earliest and has been the most widely used animation technique.
Developing a cel animation is a multistage process. Cels are first drawn on paper using pencil. Then they are traced on celluloid (or acetate) using ink, typically with a brush. After inking is complete, each cel is painted. Finally they are filmed, one frame at a time. There are 24 frames for each second of film. The actual process involves a number of techniques and procedures.
Putting the Animation in Cel Animation
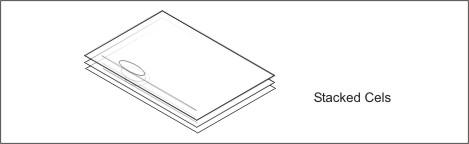
The most basic technique for creating cel animation is to draw a cel (on celluloid, paper, or some other material), place another sheet directly above it, draw the next cel by tracing over the original and changing the image slightly, stacking another sheet and continuing.
Figure Cels are stacked on top of one another as they are drawn
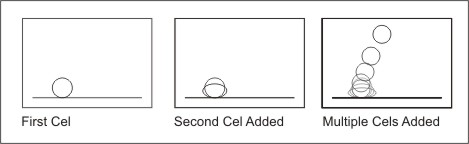
Figure Basic Cel Animation
Two basic requirements need to be met for effective drawing of successive cels
- you need to keep the cels aligned, or registered, as you work on them, and
- you need to be able to see through the media in order to see several cels below the current one.
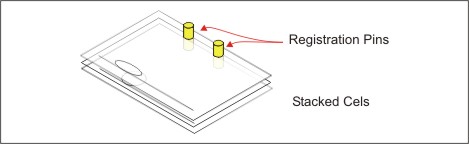
Keeping the cels aligned is accomplished by using registration pins.
Figure Registration Pins to Align Animation Cels
The transparency issue is solved by using a media that is translucent or transparent, and by using a light table. Since animation requires precise alignment form one frame to the next it is essential to be able to see the previous cel when drawing the current one. The technique of looking down through several cels while drawing the current one is called onionskinning, after the type of translucent paper used for the purpose.
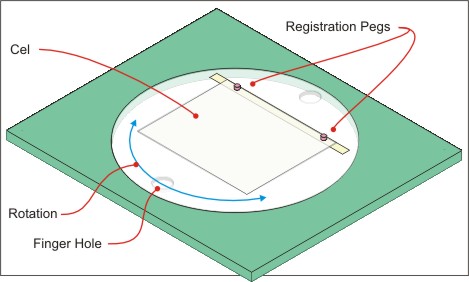
Animators' light tables have particular features. They provide a work surface of white plastic or glass set into the surface of a drawing table. The work surface has a set of registration pegs to hold the cels. Usually the work surface is circular and can be rotated to allow the animator to work on the cel from any angle. Finally, there is a light below the table which makes it easier for the animator to see down through the layers of cels.
Figure Animators Light Table
Stages of the Cel Animation Process
Cel animation is broken into these major stages
- Planning and storyboarding. This is the initial stage of the design process. The big ideas are worked out, and a story line is produced on a story board. The story board identifies key concepts and steps, or points, in the story. Key frames are sketched in the storyboard, along with detailed information about lead in and transition out of the frame.
- Detailed story. This stage is used to work out the details of the story and determine the actions in detail, including visual and audio effects.
- Key frames and tweens. During this stage the key frames are produced. Key frames are the apex of the action. They are the critical frames, which if viewed alone, would be sufficient for the viewer to understand the action. Tweens, or in-betweens, are identified and produced next. These are frames that fill in the action and make it smoother. The number of tweens also controls the speed of the action. More tweens slows it down and fewer speeds it up. Since the frame rate (number of frames per second) that will be used to play the animation constant (24 fps for file, 30 fps for video), if there are more of them it takes longer to play them, hence the slowing down of the action. This stage is primarily pencil drawings
- Test shots. Test shots are used to determine of the animation is working smoothly, if the details are correct, and so on. Pencil tests, which are animations of the initial cels drawn in pencil, are used to work out motion details. Colour tests, which are fully coloured cels, are used to see the final effect.
- Inking cels. While the pencil drawings may be done on paper, inking is done on celluloid or acetate. It is traditionally done using a brush, since that gives better control over line width, including varying the line thickness along its length. Inked cels provide solid outlines to all the important edges in the animation
- Colouring cels. Cels are painted on the bottom surface. Since the cel is clear plastic, the paint, seen through the plastic, is uniform in texture and colour.
- Filming. If film is used, 24 cels are photographed for each second of the movie. If video is used, 30 cels are shot for each second of the movie.
Principles of Animation
Most of the evolution and perfection of cel animation was done by Walt Disney Studios. Two Disney animators, Frank Thomas and Ollie Johnston, wrote a book called The Illusion of Life. In it they gave 12 essential principles of animation
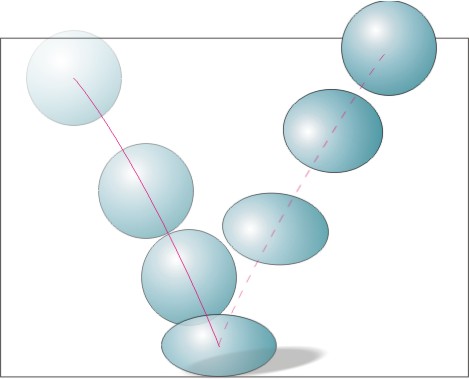
- Squash and Stretch. Used to show volume and weight of an object, and to show the effect of gravity and motion on objects. This is the most direct way to show liveliness in objects. When objects are stretched and squashed, their volume remains constant, otherwise they appear to change size.
Figure Squash and Stretch. The red line represents the path of the ballSquash and stretch is used to show how underlying muscles affect shape and motion of bodies, especially for the face.
- Timing. Time is used to show emotion, and can affect how the viewer perceives the object, particularly its mass. Remember that mass is not the same as weight. Mass is a measure of how much material, or density, an object has and its not dependant on gravity. When used to show emotion, it is controlled by tweens. Fewer tweens have more force and higher excitement levels than more tweens. The more tweens between key frames, the slower and more relaxed the action appears. Timing is also relative to the size of the character. Smaller characters tend to have less mass, and therefore are seen to more more quickly (and have fewer tweens). Try moving a heavy object and then a small light object, and observe how quickly you can accelerate them when moving them about 2 feet or so.
- Anticipation. Anticipation is preparation for action. It is followed by the action, and then completion of the action. It is an attention getting device to draw attention to the action before it happens. It builds the suspense (or comedy) in a particular action. How anticipation is used depends on volume and mass — the preparation for action may be dependant on the mass that needs to be moved.
- Staging. Staging refers to how the action is presented. It should make the action easily understood. The attitude and intentions of the character or action should be clear, and connected to the story. It also requires limiting the actions that are happening at one time to reduce confusion. Staging also includes the relationship between background and foreground, with the intent of all contributing to the desired effect while focusing the viewer on the key action.
- Follow Through and Overlapping Action. Follow through occurs when the main body of a character stops moving, and the other parts of the body catch up with it. Legs, hair, and clothes continue to move a little when the character stops. Overlapping action occurs when the main body of the character changes direction, and the secondary parts continue in the same direction, before being pulled in the new direction. Try both these actions with a piece of clothing. Hold it in the air and move it in a straight line, then stop it. Notice that is continues to move. Repeat the action, but this time abruptly change direction as you move it. Do you observe overlapping action?
- Straight Ahead Action and Pose-to-Pose Action. Straight ahead is a technique that starts with the first cel, and then works straight through to the final cel of the action. It is used to allow the action to develop in a less structured way. Pose to pose action uses key drawings to plan the action. Tweens are drawn to fill in the action between key frames. Most animations use a combination of these techniques.
- Slow In and Out. This technique uses more drawings to ease into an effect, to slow down and make it more relaxed. It is also used to accelerate from a stopped position to a moving one (or decelerate to a stop) so that the action does not start abruptly, but has a more realistic motion. Observe someone walking. Not how the foot accelerates from the stop position on the floor to the faster motion at the apex of the step and the slows down to a stop when it approaches the floor at the end of the step.
- Arcs. An arc is the natural motion of an object. Gravity affects the motion of all objects, pulling straight line motion into an arc as the path of motion is pulled back to earth. All motion paths are placed on an arc, or curved line as in the figure above under Squash and Stretch
- Exaggeration. Exaggeration is making the action, motion, or effect a bit more overdone than normal. It is required in animation to make it look more realistic. There is a balance that needs to be reached between extreme exaggeration and not enough. Too much makes it look too posed, and not enough makes it look too mechanical.
- Secondary Action. Secondary action is used to create appeal and interest. It should not draw attention away from the primary action, but should build towards and support it.
- Solid Drawing. Solid drawing refers to getting the illusion of 3 dimensionality of the characters and the space they inhabit. It extends to developing the illusion of 4 dimensionality with the addition of time—the events happen over a period of time. It is the net visual effect of the total set of drawings.
- Appeal. Appeal refers to the the effect on the audience. Are they interested in the characters? Can they follow the story? Does it have continuity? Appeal is the net effect of the animation on the audience's interest and emotional involvement.
Layers and Cycling
Most cel animation is done in layers. the background is on one layer, the body on another, arms and legs each on their own layer, and so on. This enables the animator to use a process called cycling. For example, if the only changes over 30 frames of a character walking is the movement of the background, and the arms and legs swinging, the process is
- put the background layer down first
- add the body layer
- add the arms and legs layers
- shoot the frame
- replace the arms and legs with the new set in the next position
- move the background along slightly
- shoot the frame
This process is continued until all frames are shot. As you can see, a frame can have as many as 5 or more layers. Clearly the background layer is larger than the regular cel size so that it can be moved along.
Since most walking is a repeat of the same leg and arm positions (swing left leg, right arm; followed by right leg, left arm; and so on), it is only necessary to draw the positions for one complete stride using both legs. Then the cels are reused (cycled) as often as necessary to complete the walk.
For Additional Information
If you want additional information, check these sites
- 7 Steps in Animation a Scene
- Character Animation: Principles and Practice
- 12 Principles
- Animation Art Glossary
Activity
Assigned Activities
The purpose of this activity is to develop understanding of cel animation. Please complete all parts of the activity. You will need about 10 sheets of thin paper such as tracing paper or writing paper. You will will be stacking the paper and drawing on it, and you will need to see the drawings below each sheet.
When both parts are complete
- Create an entry in your course portfolio
- Import the video clips
- Publish the entry to your course portfolio web site
Test Yourself
There is no self test for this lesson.