
Learning Resources
Lesson
Analog Video
Like analog audio, analog video information can also be recorded as a magnetic pattern on tape. The camera converts the image that is projected on the CCD (Charge-Coupled Device) into a variable voltage. The variable voltage is encoded as as a variable magnetic pattern on the tape. Although the concept is the same, and the working principles of the device are essentially the same, the actual implementation is substantially different.
Video information is much more dense (there is a lot more information in the same amount of time) than audio information. Audio information can be recorded as linear tracks on the tape. An hour of audio uses a few hundred feet of tape. An hour of video, if it were recorded as linear tracks, would take more than 50 miles of tape. Audio tapes, moving over the recording or playback head at a minimum speed of 2 cm per second, can produce acceptable sound. Video tape would need to travel at more than 4000 cm per second to produce acceptable video. Clearly this is not useful.
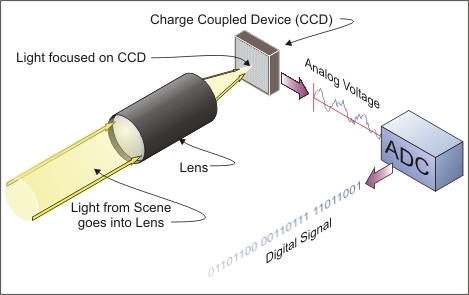
The video signal is produced by converting from light values to a variable voltage. This is accomplished in the video camera using a lens and a CCD.
Figure Camera Converts Light into Analog Voltage
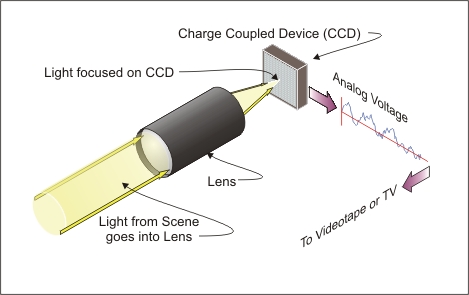
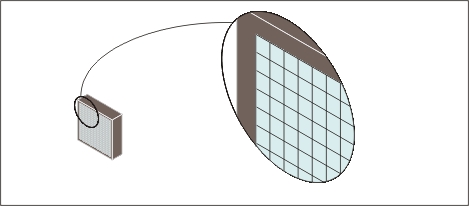
The CCD is a small block containing a grid of photodiode light sensors. The grid, which is less than a centimetre square, contains from 300,000 to 500,000 sensors. Ignoring sensors around the perimeter used for image quality management, the number of sensors corresponds roughly to the number of pixels.
Figure Photodiode Sensors in a CCD
Each photodiode in the grid of sensors is sensitive to light. As light falls on it is produces a voltage. Increasing the light increases the voltage. Each sensor measures independently of the others. The voltages are read for the whole grid and combined in order to produce a variable-voltage analog signal.
Figure Each Photodiode Sensor in the CCD converts Light Energy to a Voltage
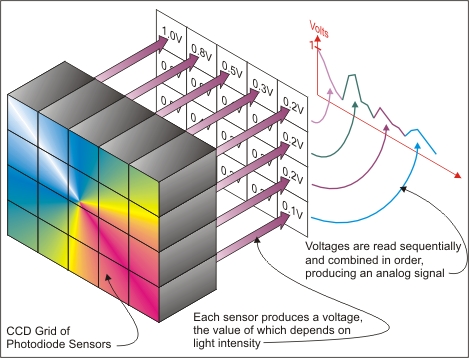
A video camera needs to produce a signal that a TV can read. This means that it needs to take these readings many times every second. TV images are produced by electron beams scanning the TV screen. There are 512 lines 'drawn' on the screen in one frame of video, turning on and off pixels and setting their intensity. Since there are 30 frames produced every second, the camera needs to read the values on the CCD sensor grid 30 times per second. Keep in mind that there are up to 500,000 sensors, each with a unique voltage, and all are read for each frame of video.
Recording Analog Video
Because of the large amount of information that needs to be recorded, VCR designers found a unique way to put all that information on tape such that the length of the tape was reasonable. The put the video recording head inside a drum, tilted it, and made it rotate. The videotape is wrapped partly around the drum and pulled past it as the drum rotates.
Figure Video Recording Heads in Rotating Drum
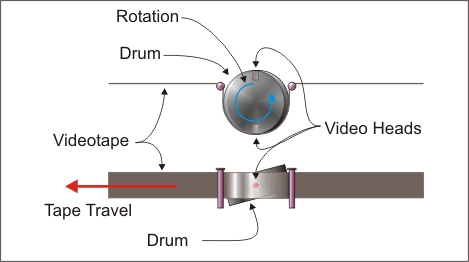
As it rotates, the tape is pulled past it, and information is written in short angled segments on the tape. Each segment corresponds to one field of information. A frame has two fields - field one has all the odd scan lines, and field two has all the even scan lines. The tape has a linear control track, running along one side. The control track keeps track of the diagonal segments of info for each field and makes sure that when the tape is played back, the head lines up with the field.
Figure Analog Video Encoding on Videotape

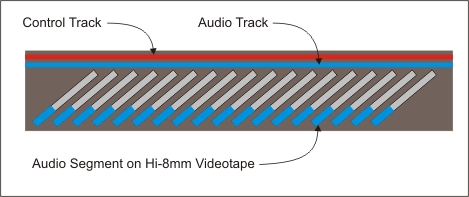
For consumer VCRs, HiFi audio is encoded within the video signal. Professional equipment records stereo as two separate linear tracks along the side of the tape. this allows audio to be edited separately from video. Hi-8mm records audio at the end of each video segment. This also allows audio to be edited separately from video.
Figure Audio Segments at End of Video Segments
Editing Analog Video
It should be apparent from the diagrams that editing videotape by cutting and rearranging is not possible. Editing is done by copying video and audio segments from one tape to another tape, rearranging them as you go. The source videos are edited to a new tape called a master. The editing process creates a second generations videotape. Copies are then made from the master for general use. These are third generation videotapes. Each generation looses video quality as the signal is degraded every time it is copied.
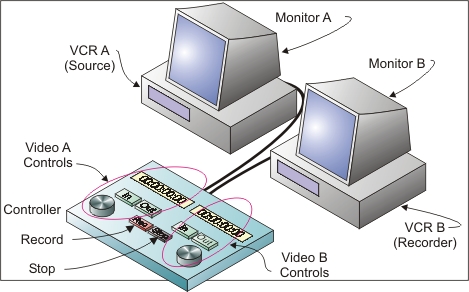
While the process can be quite complex and requires quite expensive equipment for broadcast quality copies, the basic procedure is the same for any level of equipment. A prosumer (high end consumer) grade setup uses one source VCR and one recording VCR. Both are controlled by an edit controller.
Figure Typical Setup for A-B Edit Control for Analog Video
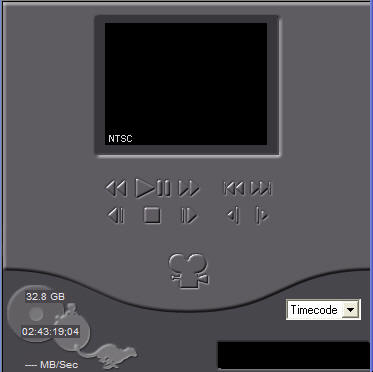
Figure Edit Controller Details. The Knobs are Jog Shuttle Controllers. The readouts give time in hours, minutes, seconds, and frames
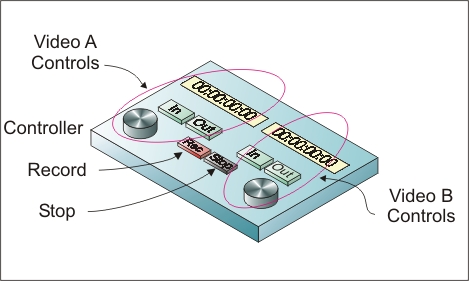
Jog shuttle controls allow variable speed forward and backwards on the tape, from single frame advance to high speed. There is a stop at the play position.
Editing analog video consists of the following sequence. The jog shuttles on the controller are used to perform all functions on VCR A and VCR B.
- Place source tape in VCR A
- Place blank recording tape in VCR B
- Review contents on source tape
- Go to the starting point of the first clip you want to copy, and press the In button on the source control
- Go to the end point of the fist clip you want to copy on the source tape and press the End button on the source control
- Go to the point on the recording tape where you want to begin recording the first clip, and press the In button
- Press the Record button. Both VCRs will rewind to 5 seconds before the in points that you set and begin rolling. When both VCRs hit the in point, recording begins. It stops when the out point on the source tape is reached.
- Continue the process of selecting in and out points on video clips on the source tape, and in points on the recording tape and recording the clips.
This method usually allows recording of two separate audio tracks. Narration and music can be added to tracks separately from video.
At the professional end, equipment includes titlers, special effects, signal sync, and edit decision list generators and edit decision list controllers.
Converting Analog Video to Digital
Two ways to convert analog video to digital video are
- connect the analog video source to a digital camcorder
- connect the analog video source to a computer through a video capture card
Conversion using Digital Camcorder
Many digital camcorders will record from analog sources, converting the source to digital as it does so using its built-in ADC. Video out from the source is connected to video in on the digital camcorder, as shown below.
Figure Analog Camcorder (right) connected to Digital Camcorder (left)
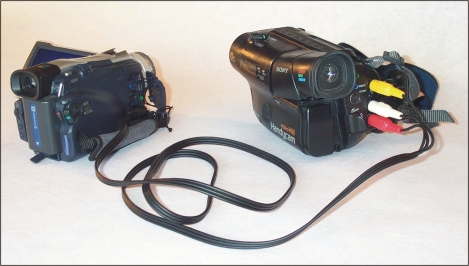
Play the tape on the analog source while recording in VCR mode on the digital Camcorder. This method can also be used with the digital camcorder connected to the computer through FireWire. Any analog source can be used, including broadcast video (cable, antenna, or satellite) and pre-recorded video from VCRs, camcorders, or DVDs.
Conversion using Video Capture
This method requires an external or internal video capture card. The device is an ADC. This method gives software control over the video capture, but the controls on the video source must be operated manually. When you are ready to record on the computer, you need to ensure the video source is live (tape is playing, for example) before selecting record in the software.
Figure Typical Video Capture Setup
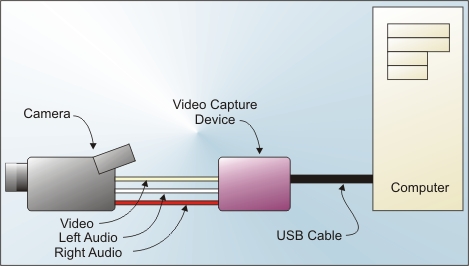
As an ADC, the video capture device takes incoming analog video and audio, and converts it to a digital data stream, which is sent to the computer via the USB port. Because of the large volume of data, many video capture devices will not capture full colour, full screen, full motion video. For example, the video size may be reduced to 320 by 240 pixels (full size TV is 728 by 468 in overscan), the frame rate may be reduced to 15 or even 10 per second (normal is 30, with 2 fields per frame), and 16 bit colour (normal is 24 bit, or 1.67 million colours).
Analog to digital conversion can be a lossy process, especially with inexpensive equipment. Some video capture devices are one-way. They cannot transfer video from the computer to VCR, since they do not have a DAC.
For Additional Information
Try these sites
- How an Analog VCR Works (very technical)
- How Stuff Works' How Camcorders Work
- How Stuff Works' How a VCR Works
- Video Formats
- Digitizing Video
Digital Video Recording
Digital video recording begins just like analog video recording. The lens and CCD work the same way, converting light energy into a voltage for every sensor in the array. The analog signal then goes to an ADC and is converted into a digital data stream.
Figure Digital Camcorder
The recording end of the camcorder is basically design as analog recording. It uses a tilted rotary drum with recording heads inside the drum. It records the signal as a series of magnetic pulses, corresponding to the 0's and 1's in the digital data stream. The data is arranged in bytes, or sets of 8 binary digits (bits).
Transferring digital video from the camera to the computer is a data transfer. There is no data loss. There is format conversion, since the data is encoded differently on the digital tape than it is on the computer harddrive.
Digital camcorders use a IEEE 1394 bus (FireWire / i-Link) to transfer digital video. The computer needs this bus as well. Many computers have them on the motherboard, others have them as add-in PCI cards. Software is also required. Most digital camcorders come complete with software. The software provides controls for
- transferring video to the computer
- editing the video, including adding special effects and titling
- writing the video to CD or DVD
- sending the video back to the camcorder.
Software also has transport controls (play, forward, reverse, etc) to control the camcorder.
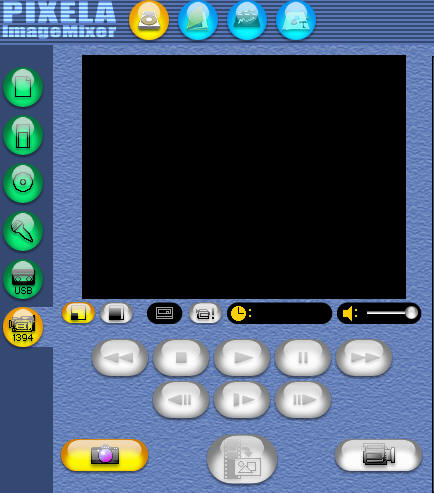
Sony Digital Camcorders come with a program called Pixela Imagemixer
Figure Pixela Screen Shot showing Transport Controls for Camcorder
There are many software applications for transferring digital video from camera to computer. Many of them also work equally well with analog-digital video capture devices.
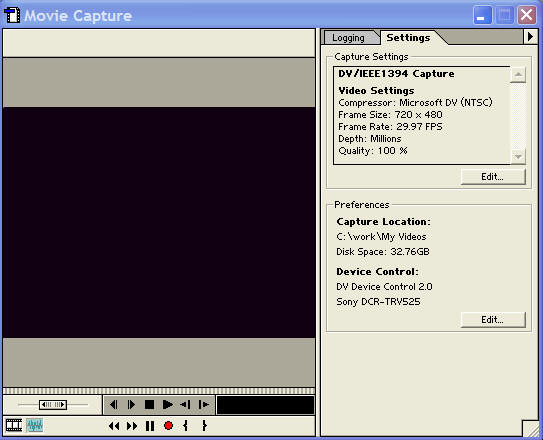
Figure Digital Camcorder Controls in Adobe Premiere
Digital Video Camcorders
There are several consumer formats.
- MiniDV, which is made by all manufacturers, which records on MiniDV tape
- Digital8, which is made only by Sony, which records on 8mm or Hi-8mm tape
- MicroDV, made only by Sony which records on a MicroDV tape
- DVD-DV, which records directly to blank DVD media
- Hard-drive-DV, which records directly to a built-in hard drive
Most, but not all, miniDV camcorders allow two way transfer of video - to the computer from tape, and to tape from the computer. All Digital8 camcorders have this feature.
Editing Digital Video
Digital video is the same, regardless of how it got into the computer. Editing it is also the same process. All video editing programs have similar functions. Except for the inexpensive programs that come with some hardware, all present an interface similar to the following.
Figure Typical Video Editing Software Interface
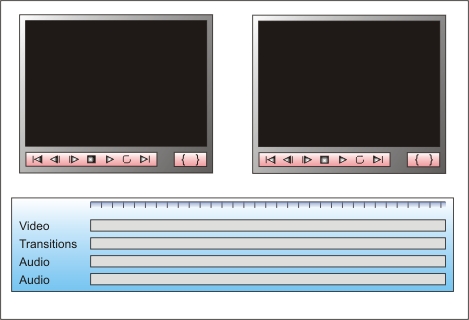
Video editing software usually has one or two video windows. The left window is for source video, corresponding loosely to VCR A, used as the source video in analog editing. The right window is used to show edited video. Both windows have video controls such as go to beginning, back one frame, forward one frame, stop/pause, play, rewind, and go to last frame. There are also controls to mark edit In and Out points.
Video is edited on a timeline. There are separate timelines for video, transitions and audio. More expensive software allows multiple video, transition, and audio timelines.
Video is edited by marking In and Out points, then dragging the clip to the timeline. While analog video cannot be moved to another location on the tape once it is copied, digital video has no such limitations. Clips can be moved on anywhere on the timeline. Clips can be cut into pieces at any time, and other clips inserted between the two pieces. Audio can be added at any time. Usually, the volume can be controlled independently for each audio track .
Transitions are special effects that are applied to make the transition from one clip to another. Most of the time, there is no effect used. Effects include wipes, dissolves, horizontal slides, rolls, window blinds, and shutters.
Some software also includes titles. These are overlaid on top of the video, and can combine with effects such as fade in.
For Additional Information
Try these sites
- A Short Course in Digital Video
- Consumer and Professional Digital Video (DV) Recording and Data Formats (technical paper)
- How Stuff Works' How Video Editing Works
- Lighting 101 Series
Activity
Assigned Activities
The purpose of this activity is to develop capability with producing digital video.
This activity requires the use of a camcorder, and Dazzle Digital Video Creator 80 or similar video capture device. Video editing will be done with Dazzle's Moviestar or similar program. The activity is experimental in nature, and not intended to result in a polished video with story line.
Complete the following
Test Yourself
There is no self test for this lesson.