
Learning Resources
Analog and Digital Video
Assigned Activities Step 2
Post Production
Complete the following sequence of activities
Setup Moviestar for Editing
- Click the Edit button (top left) to enter edit mode
- Click the Timeline button (bottom left) to enter timeline mode for editing
- Review the features available in edit mode. Changing Controls gives different functionality to the mouse.
- This would be a good time to save your project. Change the default location to your documents folder.
Edit the Video
- Drag a video clip onto the video timeline (click on the clip, hold the left mouse button, drag to the video timeline and release). You should see something like this. If you can't see all of the clip in the window, click on the Magnify control, and right click on the timeline until you see the full clip. If go too far, repeat with the left mouse button. Don't forget to click on the pointer (select tool) when you are done.
Figure Video Clip on Timeline. The first and last frame are shown
- Trim the ends of the video clip. There are two methods
- Click on the yellow tab on the end of the video clip and drag it left or right. You cannot make it longer than it is, but you can make it shorter. You will see the effect in the Clip In and Clip Out windows
- Drag the slider below the Clip In or Clip Out windows, as shown below
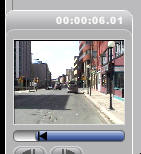
Figure Clip In Window with In Point Adjusted and Clip Out Window with Out Point Adjusted
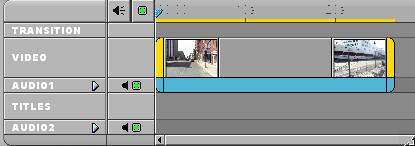
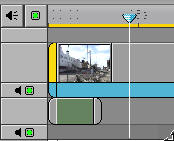
- When you are done with trimming the clip, drag a new clip to the timeline, and drop it anywhere to the right of the first one.
Figure Two Clips on Timeline
- Edit the In and Out points of the second clip
- Add all the clips and trim them
- You can change the sequence by clicking on a clip and dragging it before or after another clip.
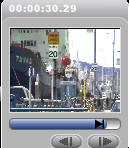
- To see the video as you modify it, you can 'scrub' along the timeline. Click on the blue pointer (inverted triangle with vertical white line below) and drag it along the timeline. Note that the video 'plays' in the window as you do so
Figure Video Pointer
Add Transitions
- Click on the Transitions Tab
Figure Transitions Browser
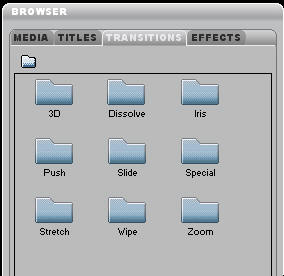
- There are 6 types of transitions. Open a folder and select a transition. You will notice that each icon 'plays' the transition effect
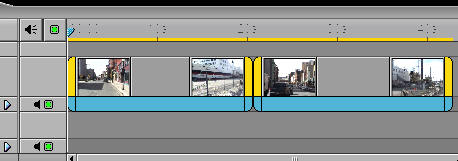
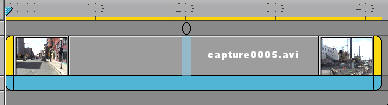
- Click on a transition and drag it to the intersection point between two clips on the video timeline. You should see this.
Figure Transition Added
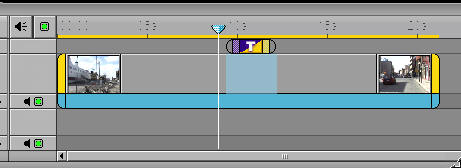
Note two things. One, the yellow bars at the adjacent ends of the two clips have changed to a single blue bar (compare to the two-clip timeline above). Two, directly above the bar, on the transitions timeline, there are two brackets ( ). In the example below, Slide category was chosen, and the Slide transition was applied. then the slide duration was modified by dragging the its ends on the transition timeline
Figure Slide Transition Applied and Duration Adjusted. Note the Transition Symbol
- Add and adjust transitions as desired. Transitions are not required. The default is a cut from one scene to the next, and is the most widely used transition. Remember that using multiple types of transition will be very confusing for the viewer.
- Save your file frequently
Add Titles
- Select the Titles tab, and then the Create sub tab
Figure Titles Create Window
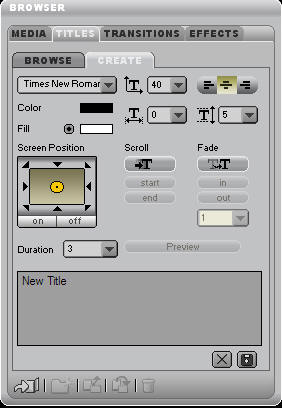
- Click in the space when it says New Title and type your title.
- Edit the Font, Size, Colour, and other effects as desired
- When you are done, click on the save title button
 (bott0m right of title edit window)
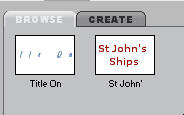
 - You will be taken back to the title Browse window, and your new title will be listed there.
Figure Two Titles
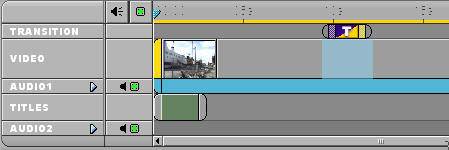
- Click on the title, and drag it to the Titles timeline. You can position it anywhere you want. The one below is shown at the beginning of the video
Figure Title Added to Video
- Add as many titles as required
- Save your file frequently
Produce the Video
To produce the video, you must select the output parameters and save the file. An example is shown below. You may wish to experiment with different settings, producing the video each time with a different file name. That will enable you to compare video quality, file size and so on. Record your setting for each setup.
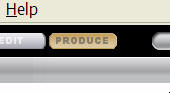
- Click on the Produce button
Figure Produce Button Selected
- This gives you a new set of options, just to the right of the video window
Figure Produce Options
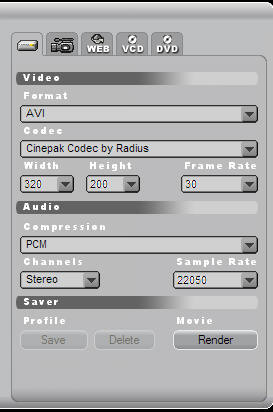
- Keep the default tab selected. The web tab is for publishing to Dazzle's Webcast Theatre and will not be used in this course
- Leave AVI selected as Format
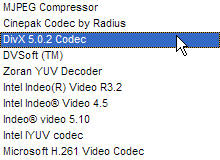
- Change the Codec. Click on the drop down arrow to the right and select the DivX Codec. You may see a different list than the one shown below, but the DivX Codec should be there since it was installed in order for previous videos to be viewed.
Figure DivX 5.0.2 Codec Selected
- Change the Sample Rate to the Lowest Number
- When you are done, Click the Render Button. A file window will open. Select the location you wish to save the file, give it a file name and click Save. You should see the progress in the lower left of the program window.
Figure Progress Indicator for Producing Video

Review your Product
Using Windows Explorer, find the video files you saved, and open each one of them to determine how they worked.