
Learning Resources
Lesson
Cel animation using software follows the same processes as traditional cel animation. As you have already learned, the process is
- The story is written
- The storyboard is developed, showing key frames, action, timing and dialog for each key frame
- Key frames are drawn using pencil
- In between frames are drawn using pencil
- Pencil tests are done to check the animation sequences
- Cels are inked on celluloid or acetate. Each frame may be made of multiple layers, with the background being the lowest layer. A different cel is inked for each layer. Some cels may be used over again many times in different frames. For example, a walking sequence may have the same set of 10 leg positions used over and over for each step the character takes. Rather than redrawing them, the same set is reused in a process called cycling.
- Cels are painted
- An exposure sheet is developed showing which cels are used for each frame, and the order that they are stacked. The exposure sheet also includes information on
- Each frame is composed by stacking the coloured cels in the correct order. Frames are filmed in the proper sequence.
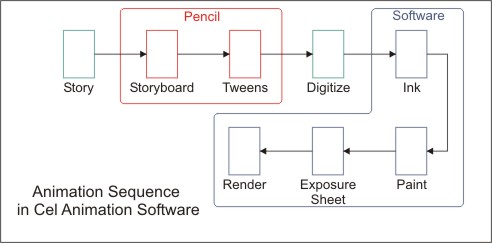
Cel animation software provides tools to improve productivity. Tools include exposure sheets, inking, and paint. Software also makes it easier to layer the cels to create a frame, and automates the conversion to video or film. A typical sequence for building cel animation using software is
- Write the story (using any software, or by hand)
- Build the storyboard (sketching on storyboard sheets)
- Draw the key frames using a pencil on animation grid paper
- Draw the tweens using a pencil on paper
- Digitize the frames into the computer by using a scanner or a video capture device. The software semi-automates this process. Better quality software will automatically convert the pencil drawings to ink. As the drawings are digitized and saved, they need to be named and assigned to a layer for future reference when the animation is being composed.
- Using the paint software, cels are painted. The paint software allows the operator to assign the same colour to an item on all cels assigned to the same layer, for example. In the walking example above, if the body was on layer 1, you could paint the shirt red, and have the software do that for all cels assigned to layer 1. This greatly speeds up the painting process.
- Exposure sheet is built. The exposure sheet software allows the operator to assign cels to layers in a frame. Using the walking example again, if the left leg is drawn 10 times to show a complete step, there are 10 cels, numbered say, leftleg1 to leftleg10. If the left leg in on layer 4, then the sequence can get entered on layer 4 in 10 frames, and then repeated in the next 10 frames and so on for as many steps as are needed. Only one drawing of each cel in the sequence is needed—they get used over and over. The exposure sheet, when run, builds the animation on screen automatically.
- The animation transferred to video or film. The exposure sheet is run, and the conversion to video or film is made.
Figure Animation Sequence in Cel Animation Software
Often cel animation software allows you to build key frames and tweens directly in the application. Onionskinning is a standard feature in animation software. It allows you to see frames before the current one (usually up to five) and frames after the current one. Previous frames are shown in one colour, the current frame uses the drawing colours. and higher frames use another colour
Timeline or Exposure Sheet?
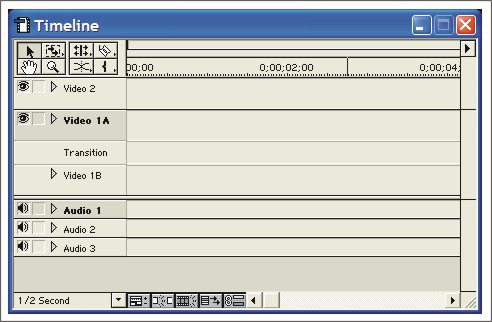
Video editing software uses a timeline to organize video and audio clips, special effects, titles and the like. Cel animation software uses the exposure sheet for this purpose. A typical video editing timeline puts time along the X or horizontal axis, and stacks layers of content on the Y or vertical axis.
Figure Adobe Premiere Timeline
Exposure sheets used in cel animation software put time on the vertical axis, and arranges layers of content on the X axis, similarly to the paper version.
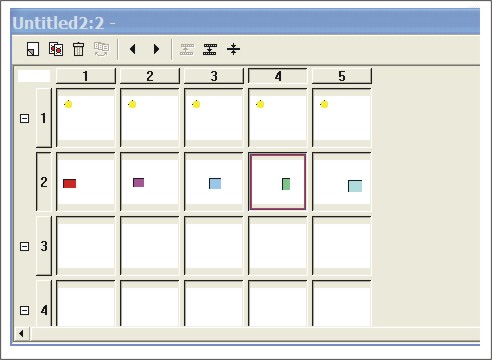
Toon Boom Studio, for example, is a professional level cel animation program that follows the traditional animation sequence. It is vector-based and allows high level control over all aspects of the process. Frames are numbered vertically on the left (24 frames per second for film, 30 for video). Each drawing along the horizontal line is a cel that is layered to make the frame.
Figure Toon Boom Studio Exposure Sheet
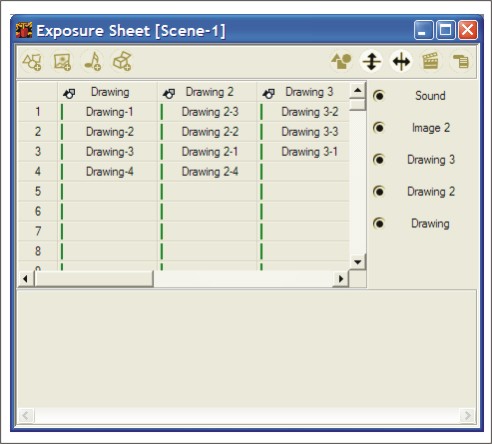
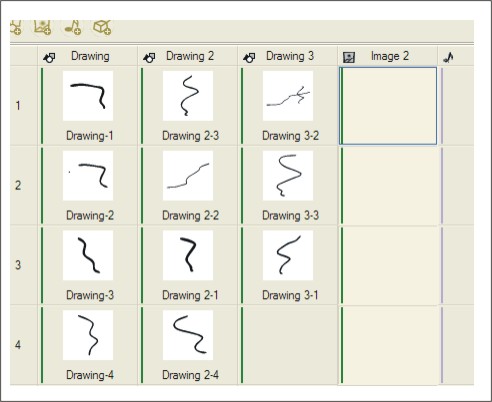
Figure Toon Boom Studio Exposure Sheet showing the cel contents.
WebPainter is a bitmap drawing tool that uses a form of exposure sheet. It is, however, organized like the video timeline. Frames are numbered along the top from left to right. Layers are numbered along the left, from top to bottom. The exposure sheet shows cel contents. WebPainter is a limited function tool, originally designed to do animated gifs. but expanded to allow production of video clips.
Figure Exposure Sheet in WebPainter.
Corel RAVE 2, bundled with Corel Draw 11, uses a timeline style exposure sheet. It is similar in function and appearance to the one used in Macromedia Flash. It allows a large number of layers. It is vector based, and multiple objects are allowed on each layer. Objects can be ordered in a front to back hierarchy.
For Additional Information
Here are 2D Cel animation web sites to explore. Look at the product descriptions, samples of work and so on.
- Traditional, professional cel animation software
- Toon Boom Studio
- Retas! Pro. There is an extensive gallery.
- Software modeled on cel animation, but bitmapped and with few automation features
- Multipurpose animation software. Can emulate cel animation, as well as perform other styles of animation.
- Corel RAVE 2
- Macromedia Flash MX
- Animation Studios. Companies that produce animation.
- Pixar Animation Studios. This one's 3d, but added for comparison.
Activity
Assigned Activities
The purpose of this activity is to develop understanding of digital cel animation basics. Please complete all activities.
This activity is based on Corel RAVE 2.0. Other tools that can be used include Toon Boom Studio, or Flash MX. Both of these applications have downloadable demo versions that will function for 30 days. You will need to learn how to use them, and there are downloadable tutorials for both. The learning curve for Toon Boom is comparable to learning RAVE 2.0. The learning curve for Flash MX is much longer. Of the two, Toon Boom is most suited to this activity. If you use it, be sure to complete the tutorials.
- Step 1. Complete Corel RAVE 2.0 Tutorials
- Step 2. Create a Cel animation
- Step 3. Publish the animation to your Course Portfolio Web
Test Yourself
There is no self test for this lesson.