
Learning Resources
Lesson
Now that you've experimented a little with cel animation, it is necessary to do a bit more planning before commencing a larger project. You need to develop the story, determine how the story is presented, and develop the storyboard.
The Basic Storyline
Planning an animation starts with an idea. The idea is expressed in the form of a story. The story has a beginning, a middle, and an end. The story can be simple or complex. It can be very straightforward, or it can be convoluted. The more complex the story, the more work required to animate it.
It is best to express the idea in as few sentences as possible. Stick to the key concepts, or action points. For example
Resistors at Work or Resistance is Not Just for Dissidents
An energy source, for example a battery, is applied to a resistor. The energy is measured in Volts (think of it as pressure).
Energy, in the form of electrons, flows through the resistor
The resistor converts some of the energy to heat (it gets hotter).
Electrons leaving the resistor have less energy than when they entered.Hot Chocolate gets Suspended
Chocolate powder is added to hot water
The mixture is stirred thoroughly
The mixture is uniform
Time elapses
All the chocolate settles to the bottom of the container
The water is clear again
The key to effective animation is having a clear understanding of what you are trying to say.
Presentation
When the story is determined, the presentation needs to be sorted out. Is it serious, comedic, happy, sad? What devices will be used to illustrate the key ideas?
Using the Resistors at Work example above, possible presentations include
One
The battery and resistor are characters with legs, arms, etc. The resistor is asleep
The battery walks up, holds both the resistor's hands in its hands and forces electrons through the resistor
The resistor starts to turn red and sweatTwo
The battery, resistor, and wire are just objects
The battery contains very energetic little electrons. They are characters with arms, legs, etc that like to march around very quickly and precisely.
The wire is a hollow tube
The resistor is a corridor with protruding hair-like filaments that electrons must push aside to get through.
An animated character connects the battery to the resistor with the wires.
The electrons march energetically into the resistor
The electrons work hard getting through the resistor, getting overheated as they do. The resistor gets hot
The electrons exit the other side and go back to the battery, looking tired and dragging their feet, where they get rejuvenated.
As you can see, many approaches are possible. Developing the animation storyboard will provide additional ideas for expanding the approach, and for modifying it.
Storyboard
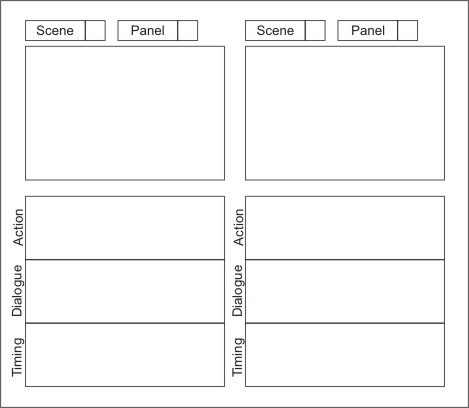
The storyboard is a standard sheet that has places to indicate key frames and anecdotal information about them.
Figure Storyboard Template
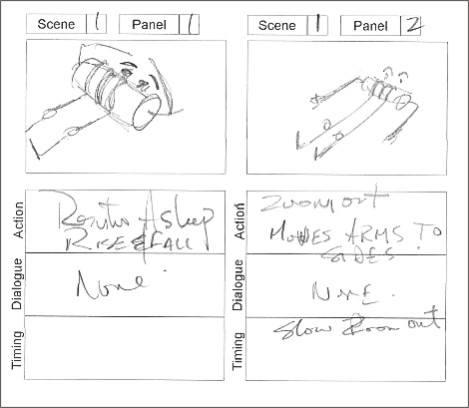
Used with the example above, it might look like this
Figure Storyboard Example
Storyboards enable you to think through the elements of the story and work out the details of the presentation. Elements for a great storyboard include
- use a variety of shots, some close-up, some wide
- create tension by showing the audience things the characters can't see
- use establishing shots to show the viewer the total scene
- use cutaways to show little details
- use extreme close-ups
- use point of view shots—show what the character sees
- use enough drawings to show the action
Exposure Sheet
The exposure sheet is a complete list of cels, along with information about how they are used, sound, voice, and other effects. Exposure sheets are created for the camera operator to use when filming the animation. A typical exposure sheet is shown below.
| Scene | Title | Animator | Footage | Sheet # |
| Action | Dialogue | 4 | 3 | 2 | 1 | Bkg | Camera Instructions |
| 1 | |||||||
| 2 | |||||||
| 3 | |||||||
| 4 | |||||||
| 5 | |||||||
| 6 | |||||||
| 7 | |||||||
| 8 | |||||||
| 9 | |||||||
| 0 | |||||||
| 1 |
Explanation of terms
- Sheet #. sheets are numbered sequentially
- Action is a note on what is happening in the frame
- Dialogue is the part of a sound that is made in the frame
- 4, 3, 2, 1, are the cel layers that are stacked up for the frame. #1 is the lowest, sitting on top of the background layer. #4 is the highest
- Bkg is the background cel for the frame
For Additional Information
- An Introduction to Storyboarding
- Concept to Creation: Story and Storyboards
- Illustrated Glossary of Animation Index
- Lessons in Drawing for Animation (4 parts)
Activity
Assigned Activities
The purpose of this activity is to gain experience with planning an animation. Please complete all steps. You will need to open and print a number of copies of the storyboard template and the exposure sheet template.
- Develop an idea or concept for an animation (about 30 frames)
- Outline the story in 5-10 brief statements
- Develop the storyboard, with a frame for each key frame
- Fill in the exposure sheet. This is a planning draft, so you need an entry for every frame. Think about the layers of cels you might need and include them
- Make an entry in your course portfolio. Include the story draft, scan and include the storyboard and exposure sheets
- Publish the entry to your course portfolio web.
Test Yourself
There is no self test for this lesson.