
Learning Resources
Lesson
A web site is essentially a folder on a web server that contains all the web pages, stylesheets and related media files (pictures, audio, video, ...) that are opened by the browser when you go to the site. Building a web site requires planning. As you have seen, this involves
- planning the visual design for pages, including fonts, colours, and navigation
- developing the stylesheet
- planning and developing the opening page
- planning and developing the folder and file naming structure
- developing the web pages
- planning and developing the media that will be used in the web pages
- publishing the content to a web server
You have already been doing much of this by using the course and design portfolio templates to record your activities in the course, and to publish the entries to the web sites.
This lesson will cover planning and developing the folder and file naming structure, and building an empty web template. Templates contain all the pages and navigation, but none of the content
Folder and File Naming Conventions
If you only have a few files and one or two folders in your web, file naming may not seem like much of an issue. After all, the names make sense when you make them. A week later, or a month later, or if a lot of files and folders have been added, people tend to forget what the names mean. Good practice is to adopt a naming scheme of folders and files that is meaningful weeks, months, or years later, and is meaningful to other people. Using a naming convention allows you to 'read' the organization of the content in a web by looking at the folder and file names.
Folder Naming
As an example of a folder naming convention (standard method used all the time), the organization of this course is presented below. All of the courses built for CDLI have the same naming convention.
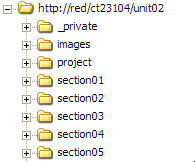
Courses are divided into units, so when they are being developed, the web is named by unit number. The web for this unit is called unit02.
Units are also divided into sections. The unit web has folders called section01, section02, and so on to hold that content. This course also has a project for each unit, so there is a projects folder called project. Finally all units have images, such as navigation buttons, that are used everywhere in the unit. They are kept in a folder called images. The whole thing looks like this
Figure CDLI Folder Naming Convention for Units
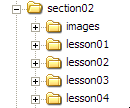
Each section of a unit can have several lessons. Since lessons can have many files, sections have lesson folders in them. Lessons usually have images in them, so there is an images folder in each section. The figure shows a typical section, this time with four lessons.
Figure CDLI Folder Naming Convention for Sections
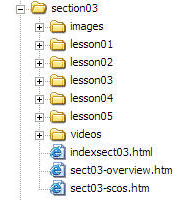
In order to keep the images separated by lesson, the images folder in each section has sub folders, one for each lesson, for example
Figure CDLI Folder Naming Convention for Lessons

File Naming
As you can see, using a system for naming folders allows you to look at the folders and understand the organization of the content. The same logic applies to naming files. Again, this unit will be used as an example.
All CDLI course units have the same files in the unit folder, shown just below the folders in the figure. They are index.html, stylesheet (style.css), evaluation (unit02-eval.html), and overview (unit02-overview.html). The unit number changes match the unit.
Figure CDLI Unit Files

All sections have the same files in them, shown in the figure below beneath the folder list (note the addition of a videos folder). They are section index (indexsect03.htm), section overview (sect03-overview.htm), and section outcomes (sect03-scos.htm). The numbers change to match the unit number.
Figure CDLI Section File Naming Convention
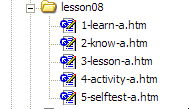
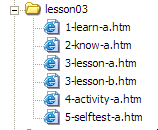
All lessons have at least 5 files, as shown in the figure of this lesson below. The five files (pages) correspond to the five buttons at the top of this page. The naming is worth commenting on. Numbering them sequentially 1 to 5 ensures that they sort in the correct order in the folder.
Figure CDLI Lesson Naming Convention
Having -a at the end of each filename allows course developers to break a file (the lesson page for example) into multiple pages, and name the sequentially (for example 3-lesson-a.htm, 3-lesson-b.htm, ...) so that they too sort into the correct order.
Figure Lesson with Multiple Parts (-a, -b)
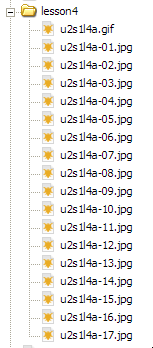
Standardization is also applied to the naming of images, as shown in the example below.
Figure CDLI Image Naming Convention
Here is what the name means
u2 - unit2
s1 - section1
l4a - lesson 4 part a
-01 - number in sequence of images
Putting it Together
The CDLI examples were from webs that contain dozens of folders and hundreds of files, all with the same repeatable pattern. They were an obvious candidate for standard naming conventions. The important thing to remember form this is that good naming conventions make it easier to plan, develop material, keep track of work, and review the material at a later date.
Your webs will likely have fewer folders and many fewer files. Here is an example of how you might organize content for a web. This is for a travel-log.
Folder Naming
- web
- 1-hamburg
- 2-paris
- 3-athens
- 4-...
Note the numbering. It forces the folders to sort in the correct order. Note there are no spaces and no capital letters. These are standard conventions for the internet, since spaces are not allowed in filenames (they won't work) and many servers are case sensitive (1-hamburg is a different folder than 1-Hamburg)
File Naming
- Web name. The web name can be most anything, for example 2003vacation. Notice there are no spaces or capitals in the name. People find it difficult to remember usage of caps, so the convention is to use none.
- Files in the web folder. One file is required
- index.html (on some computers it might be index.htm or default.htm
- Files in the places folders. These files will be in all folders
- travel.htm (information about getting to the place)
- day1.htm (as the name says, info about the first day in the place)
- day2.htm
- ...
Building the Travel-log Web Structure
This section of the lesson looks at how to build a template that you can use to record information about your 2002 vacation (change the year as you need).
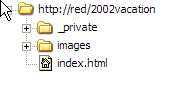
Step 1 Create the web
This was done in FrontPage by making a new one-page web and calling it 2002vacation. This resulted in a web with one file called index.html (yours may be index.htm or default.htm).
Figure Vacation Travel Log Web
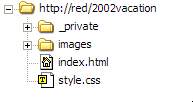
Step 2 Create the stylesheet
A stylesheet called style.css was created and imported
Step 3 Edit the index file
The index file was opened and the following information added
- in HTML view, the code
<link rel="StyleSheet" href="style.css" type="text/css">
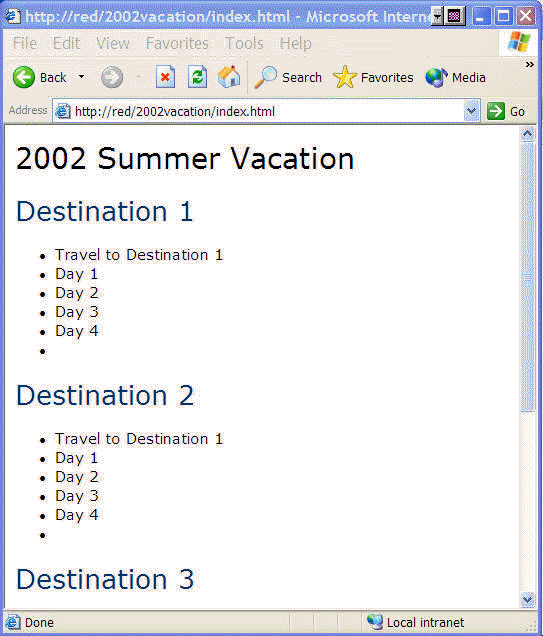
was added to the <head> section - A table of contents for the travel web was created. Links will be made as pages are added. Destination 1 will be changed to the actual name as entries are made.
Figure Travel Log index.html
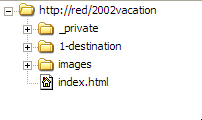
Step 4 Make a Destination folder
In Folder View, a new folder was created and named 1-destination. Destination can be replaced at a later time with the actual destination (keep the 1- at the beginning)
Figure First Destination Folder
Step 5 Make the Files in the 1-destination folder
There are several ways to do this. The following method was used.
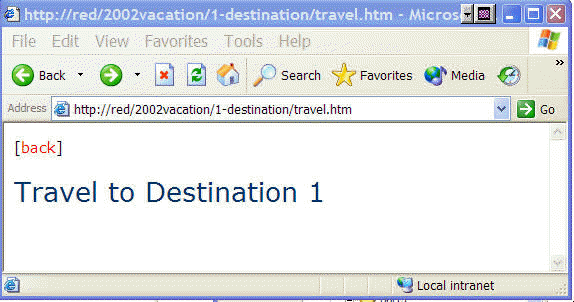
- The folder was opened in Folder View. A click on the New Page Icon in the tool bar created a new file called new_page_1.htm in the 1-destination folder. It was immediately renamed travel.htm
- travel.htm was opened and the following added
- in HTML view, the text
<link rel="StyleSheet" href="../style.css" type="text/css">
was added in the <head> section (note the ../style, ../ is required because the style.css file is up one folder in the structure) - in Normal view, the text Travel to Destination 1 was added and tagged as Heading 2
- in Normal view, the text (back) was added and a link made to the index file
this resulted in this file
- in HTML view, the text
Figure Travel to page
- in Folder View, with 1-destination open, travel.htm was copied (CTRL-C) and pasted (CTRL-V) three times. The copies were renamed day1.htm, day2.htm, and day3.htm as shown below. Copying the files also copies the stylesheet link, the page heading and the link to the index page
Figure Destination Files
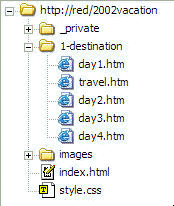
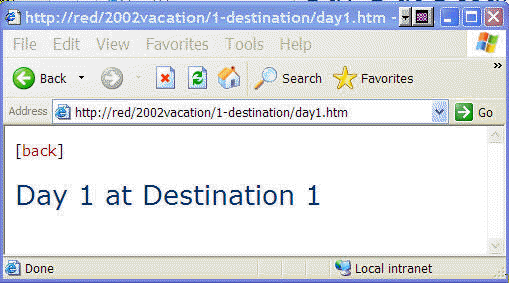
- Each file was opened and the text changed in the heading as shown for day1
Figure Heading the the Day 1 page (similar for other days)
Step 6 Copy 1-destination and make new destination folders
Now that the files are all in 1-destination, complete with links to stylesheet and index, and with headings, its time to make new destination folders. To do this, just make a copy of 1-destination, and paste it several times. This copies all the files in the folders. Here's how it was done
- In Folder View, copy (CTRL-C) the 1-destination folder. Paste (CTRL-V) once for each destination you have. this example was pasted 3 times. The copies were renamed 2-destination, 3-destination, and 4-destination, as shown below
Figure New Destination Folders
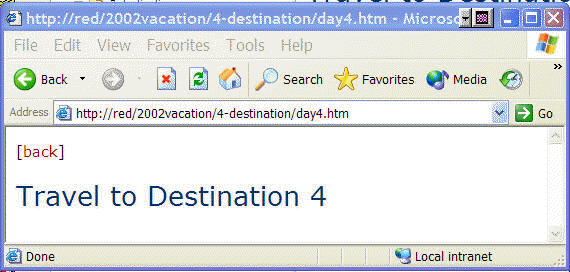
Step 7 Fix Heading in Destination Files
Now that all the destination folders and files are done, it is necessary to fix the text in the headings on each page. If you recall, the headings were
- Travel to Destination 1
- Day1 at Destination 1
- Day2 at Destination 1
- ...
FrontPage's Search and Replace utility was used to change them in each destination folder.
- In Page View, the 2-destination folder was opened, and all the files selected
- The Replace utility was opened and a search done for Destination 1, with a replace of Destination 2. All fixes were done
- This was repeated for the other destination folders, with the result as shown below
Figure Renamed Heading in 4-destination Travel Page

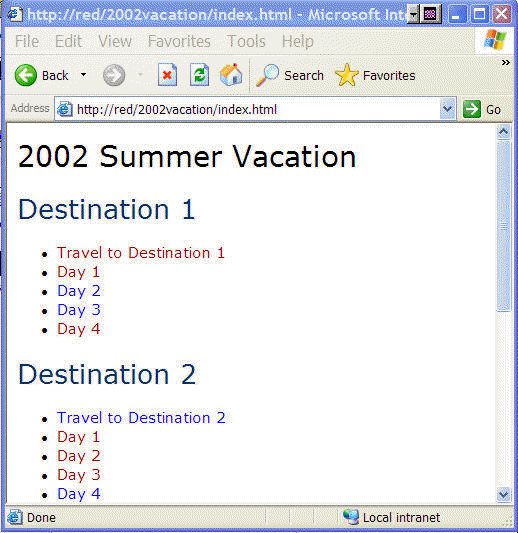
Step 8 Make links from index page
With the folders and pages constructed, links were made from the index page to each of the files. The result is shown below. As you can see, several of the links have been checked.
Figure Completed index.htm for Vacation Template
Using the Vacation Template
Based on your experience with documenting your work for this course, using both he course portfolio template and the design portfolio template, you should readily see how to use this template. As content is added, real place names are entered instead of Destination 1, etc in the text of the files. Folder names and filenames should not be changed.
You may have noticed some of the advantages of using standard names. You can quickly build a web template by copying, pasting and renaming files and headings.
It is likely that content for a vacation web would include pictures, and maybe even video. Good organization would be to make an images folder in each destination folder as a place to store media related to each destination.
Activity
Assigned activities
Please complete the following activities
- Using FrontPage, create a template for a web site. You may model it on the vacations web demonstrated in the lesson.
- Make a zip file of the entire web
- Make an entry in your course portfolio for the activity. Import the zip file and make a link to it
- Publish to your course portfolio web site
Test Yourself
There is no test for this lesson