
Learning Resources
Lesson
Bitmap images can be created from scratch or acquired using a variety of means
- From scratch
- use a paint program. Paint programs work directly in bitmap mode (see Lesson 1).
- use a vector drawing program like Corel Draw and export as a bitmap (see Lesson 3).
- Acquired
- using a scanner
- using a digital camera
- using a video cameral or VCR and digitizer such as Dazzle
- using a digital video camera and FireWire connection
- from a CD ROM image set, the internet, or other source
The technology for two image acquisition methods is described below.
Scanner
You have already learned about bitmaps, resolution, bit depth, and image size. These are important considerations for scanning images as well.
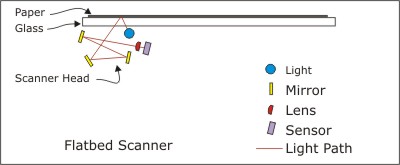
Scanners work by shining a light on the object. The reflected light bounces off several mirrors and through a lens, which focuses it on a sensor. The sensor converts the light into a voltage. Brighter light gives a higher voltage, and vice versa. An analog to digital converter (ADC) then converts the light into binary bits. To get a colour image, there is a set of red, green, and blue lights (or filters) and a different set of mirrors, lens, and sensor for each one. The basic principle is illustrated below. For a flatbed scanner, the scanner head (light, mirrors, lens, and sensor) moves along below the glass. For a sheet feed scanner, the scanner head remains motionless and the paper moves over it.
Figure Flatbed Scanner Mechanism
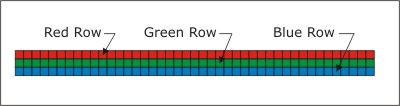
The scan head is the width of the scanner. The sensor has one row of pixels for each of red, green and blue. The concept is shown below. The actual sensors are not coloured.
Figure Scanner Sensor Array
Further Information
For more information on how scanners work, check out
- How BizStuff Works How Scanners work
- Introduction to How Scanners Work
- Anatomy of a Scanner
- How It Works
- Resolution and Interpolation
- Never the TWAIN Shall Meet
For information on how to scan pictures to get the best quality, check out
- Scanning Tips for Web Images at Art Crimes
Digital Camera
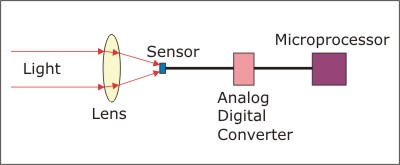
Digital cameras operate on similar principles to scanners. The light source is external to the camera and reflects off the objects being photographed. Light is focused by the lens onto the sensor, which is a grid of square light sensitive elements (pixels). Various means are used to separate the light into red, green and blue. Some of the pixels get red light, some green, and some blue. As with the scanner, light intensity determines the voltage coming out of the pixel sensor. The array of voltage signals goes to the ADC, where each is turned into a digital number and read into a holding area. The microprocessor then uses the cameras instruction set to process the information and save it to memory as a picture.
Figure Basic Digital Camera Operation
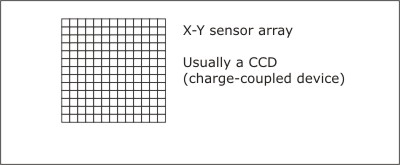
Where scanners capture a row of pixels at a time, cameras capture an x-y grid of pixels.
Figure Camera Sensor Grid
Further Information
For more information on how digital cameras work and how to use them, go to
- How BizStuff works How Digital Cameras Work
- Read the list of topics from Introduction to How Digital Cameras Work to Software
- Path of a Digital Photograph at Kodak's Digital Learning Center
Activity
Assigned activities
The purpose of this activity is to build capability with acquiring images using scanning, digital cameras or any other means available to you.
- Scan a series of black and white, grey scale and colour images
- once using the default software settings
- several times while making adjustments for resolution and bit depth so that you have images suitable for the web (75-96 dpi) and others suitable for printing (150-300 dpi)
- crop images to get the portion that you want
- make two folders, one called web, and one called print. Place the images suitable for use on the web in the web folder, ditto for images suitable for printing
- Repeat the process with any other image acquisition tools you have.
Create a suitable entry in the course portfolio to include all your folders and images. Provide a brief explanation of the effect you were trying to achieve in each image.
Test Yourself
There is no self test for this lesson.