
Learning Resources
Lesson
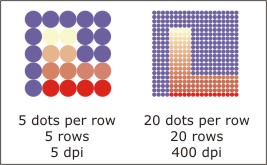
A bitmap is made up of rows of dots, each of which can have any colour. Combined, the rows make up an image. The size of the image is determined by
- the number of dots are in the row
- the number of rows
- the size of the dots (how many dots per inch)
The two images below illustrate bitmaps
Figure Bitmaps as rows of dots
Bitmap images are dependant on the technology that is used to make them. To understand them, it is necessary to know how they are affected by the technology of image displays.
Image display
Pixels
Images on a computer screen are made up of a collection of dots called pixels (picture elements). A pixel is the building block made by the computer monitor. In the case of CRTs, it is formed by the grid (or mask) behind the screen and the red/green/blue coating on the inside of the screen, each of which is lit up by one of the three electron guns. A pixel has three sub pixels of red, green, and blue called a triad.
Figure Dot Pitch

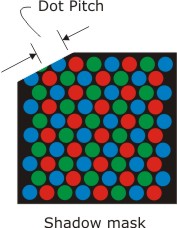
The physical size of the triad is called the dot pitch. Dot pitch is measured in millimetres. Smaller is better.
Screen Resolution
Resolution of a screen is determined by the dot pitch. Smaller dot pitch gives more pixels to the inch, and means higher resolution. Look for a dot pitch of less than .26 mm. Most PC monitors have a resolution of 96 pixels per inch.
Bit depth
The intensity of the electron gun can be changed to give different shades of each of red, green, and blue (RGB). The combination of RGB sub pixels in a single pixel creates all the other colours. black is produced by turning off all 3 guns for a pixel. White is produced by turning on all 3 guns at max value for a pixel.
If the pixel is small enough, your eye perceives the RGB sub pixels as a single colour. Because the CRT is a light source, the colours add together. This is called an additive process.
In a computer, the intensity of the electron gun is controlled in steps. Computers work with bits. Most computers now produce 24 bit colour. This is known as bit depth
- Each electron gun (Red, Green or Blue) has 28 bits or 256 steps.
- The total number of colours available is
- 28 bits X 28 bits X 28 bits or 224 bits
or put another way
- 256 X 256 X 256 which is approximately 16.7 million
- 28 bits X 28 bits X 28 bits or 224 bits
LCD monitors use a different technology to do the same thing. For more information on the technology of CRTs see
- How Television Works (cathode ray tubes-CRTs)
- More detailed 2 page CRT info from PCTech guide
Images
Bitmap images have the following characteristics
- resolution
- bit depth
- image size
- compression
- file size
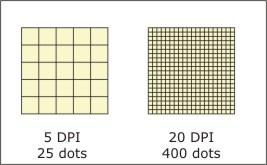
Image Resolution
Image resolution is usually expressed in pixels per inch, or ppi. This is also called dots per inch, or dpi. If the image is to be used on a monitor (in a web page, for example) is is best to make it at 96 ppi. If it is to be used for print, it is best to make it much higher. For most inkjet printers and laser printers, about 225 to 300 dpi is good. for commercial image setters it can go as high as 2400 dpi.
Higher resolution means bigger file size. An image at 96 dpi has 9216 pixels in each square inch. An image at 300 dpi has 90,000 pixels in a square inch, or ten times the size.
Figure Resolution and File Size
A 96 ppi image will display actual size on a monitor. The picture dots will be the same size as the monitor pixels. A 300 ppi image will display at 96 ppi, so it will appear much larger on the monitor. Printing size will depend on the resolution of the printer, and the settings you use in the program.
If you scale bitmap images, one of two things will happen
- if you make it larger, the dots will get bigger and the image will look to be of lower quality
- if you make the image smaller, you will lose dots, and the image quality will degrade.
Bit depth
Image bit depth works the same as monitor bit depth. Each pixels colour can be set independently. Common image bit depths are
- 1 bit or 21 (on or off). Images are black and white
- 4 bit or 24. Images have 16 colours
- 8 bit or 28. Images can be 256 colours or grey scale (256 shades of grey)
- 16 bit or 216. Images can have approx 65,000 colours
- 24 bit or 224. Images can have approx 1,670,000 colours
- 32 bit or 232. Images can have approx 1,670,000 colours and 256 levels of transparency (alpha channel)
The higher the bit depth, the more colours available. More colours means a better quality image and a larger file size.
Image size
Image size is the dimensions of the image. A number of units of measure may be used
- 800 by 500 pixels
- 5 by 4 inches
- 150 by 600 mm
The larger the image size the larger the file size
File compression
File compression is a means of reducing file size when it is saved to the hard drive. There are two basic types of compression
- lossless
- lossy
Lossless compression makes the file smaller without losing any of the information. The file does not lose quality. WinZip is a lossless compressions for non-image files.
Lossy compression loses information when it compresses the image. Image quality goes down. JPEG is a common lossy format. File size and image quality is related to the amount of compression. More compression means a smaller file size and lower quality images.
File size
File size is directly determined by resolution, bit depth, image size and type of compression used. The following images show the effects of different amounts of compression on image quality and file size
Figure No compression, file size 32k
Figure 20% compression, file size 10k
Figure 40% compression, file size 7k
Figure 60% compression, file size 6k
Figure 80% compression, file size 4k
Figure 90% compression, file size 3k
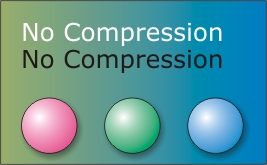
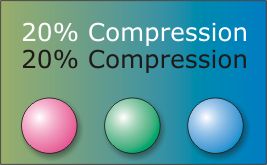
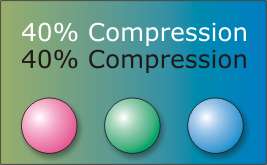
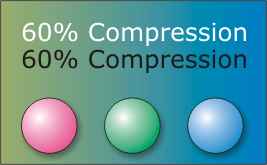
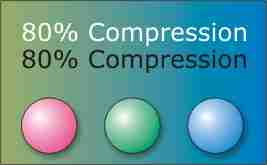
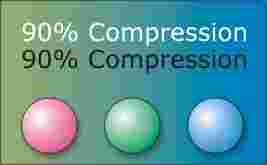
Obviously the biggest reduction is in the first 20% and it is the only one with very little image degradation, although it is quite noticeable in the blue area around the letters.
Further Information
For additional information about bitmap images go to the Kodak Digital Learning Centre and read
Activity
Assigned activities
The purpose of this activity is to build capability at creating bitmap images. There are two steps to the activity
- Step 1. Work through a series of Corel Photo Paint tutorials
- Step 2. Create bitmap images using Corel Photo Paint or Painter Classic
Step 1
Corel Paint tutorials
Corel Photo Paint has a series of tutorials called CorelTUTOR. They are available from the Help menu. To use them, start Photo Paint and click on Help, CorelTUTOR.
To familiarize yourself with its operation, you will explore a number of features in the following
- Introduction
- Basic Tutorials
You can resize the width of the tutorial by dragging the left border of the window
- Introduction
- Touring the application
- Step through all the pages, clicking on the green items in each page
- Understanding basic concepts
- Step through all the pages, reviewing all content and clicking on all the green items
- Touring the application
- Basic Tutorials
- Designing your image
- all topics
- Viewing and editing images
- all topics
- Designing your image
For additional information on how to use Corel Photo Paint try some of these sites.
- Corel Photo Paint and Draw tutorials at
http://www.corelmag.com/fre/aclass/indexa.html
Step 2
Create Bitmap Images
Read the instructions before beginning. If you need more help review the video clips. The first one is for Corel Paint. The second one is for Painter Classic. The help button gives information about viewing the video.

1 Paint
2 Painter
Create a bitmap image that is approximately 600 pixels by 400 pixels. Use a variety of shapes, lines and text using different colours.
Save the image as
a .bmp file
as a series of .jpg files with 10, 15, 20, 25, and 30 percent compression. Be sure to open the .bmp file again after each save. Give each .jpg file a new name (for example, 10.jpg, 15.jpg, and so on.
Look at the files in Windows Explorer and note the file sizes for each
Create an entry in your course portfolio for this activity, including each image and information in the entry about each image.
Test Yourself
There is no self test for this lesson.