Learning Resources
Lesson
Purpose of the design portfolio
The Design Portfolio is a tool used by students. It
- is a record of all the activities and decisions made during the design activity
- provides a structure for individual and group reporting
- provides the necessary information used to build the final report which is presented by students at the end of the design activity
The Design Portfolio is also used by teachers to understand how students developed the solution. It is used to provide feedback throughout the design activity and to assess student achievement. The Design Portfolio documents the students' decision-making processes and is a significant tool in assessing growth in design capability. The Design Portfolio is an extremely important tool used in determining student grades.
Components of the design portfolio
Organization
The portfolio is a web template used in Microsoft FrontPage. The template has all the essential web pages built, along with all the navigation structure to make it work. It has the following organization for navigating through the pages
- Daily Journal
- Design Stage 1 Identify the Opportunity
- Part 1. Opportunities and Problem Situations
- Part 2. Opportunity/Problem to be Developed
- Design Stage 2 Conduct the Design Study
- Part 1 Clients and Contracts
- Part 2 Write the Design Brief
- Part 3 Conduct Investigation and Research
- Part 4 Identify Solution Options
- Part 5 Establish Assessment Criteria
- Part 6 Apply the Criteria-Assess the Solution Options
- Part 7 Specify the Solution to be Developed
- Design Stage 3 Develop the Solution
- Part 1 Development Plan
- Part 2 Print Components
- Part 3 Multimedia Components
- Part 4 Web Site Components
- Design Stage 4 Evaluate the Solution
- Part 1 Determine what to Evaluate
- Part 2 Establish Assessment Criteria
- Part 3 Apply the Criteria - Assess the Solution
- Part 4 Interpret the Results - Evaluate the Solution
- Part 5 Using the Results - Deciding what to Do
- Design Stage 5 Report the Results
- Part 1 Build the Report
- Part 2 Present the Report
Template Structure
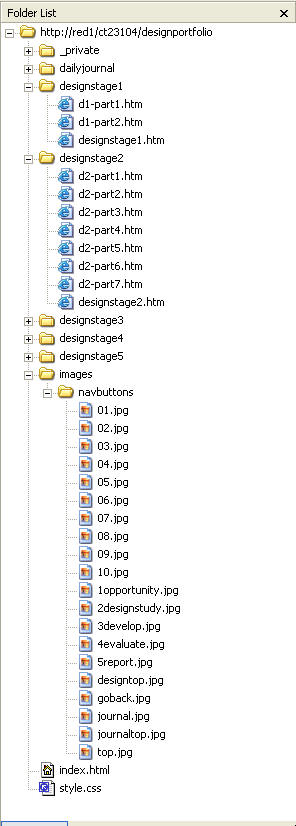
The template consists of folders and files (web pages). The figure below shows the structure. Clicking on index.html, journal.htm, or any of the designstage files below will open the corresponding file in the template. From there you can open any of the others. All the files with part in the name are the ones used to enter your information. Style.css is an exception.
Figure Design Template
Style Sheet
As noted above, style.css is a different kind of file. It is a style sheet. It is a plain text file that has formatting information that the browser uses. The file looks like this
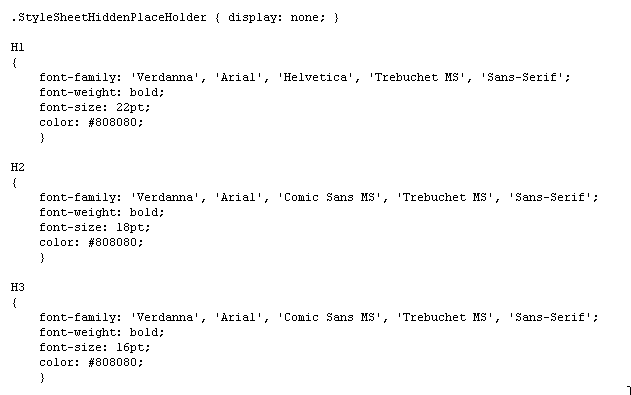
Figure style.css
In order for the file to work, an entry like the following must be in the html code of every web page (usually put just before the </head> code)
<link rel="StyleSheet" href="style.css" type="text/css">
If you change the content of this file, you will change the look of all pages in the template. For example, changing color: #808080 to color #008080 would change heading colours from grey to green. If you delete the file, browsers will not be able to load the web pages.
Navigation Images
Navigation images are used to make it easier for people to get around in a website. The navigation images are shown below, followed by an explanatory table
Figure Navigation Images
| Navigation Images Explained | |
| Item | Link |
| Design Portfolio | the opening page (index.html) |
| Daily Journal | no link |
| Opportunity | /designstage1/designstage1.htm |
| Design Study | /designstage2/designstage2.htm |
| Develop | /designstage3/designstage3.htm |
| Evaluate | /designstage4/designstage4.htm |
| Report | /designstage5/designstage5.htm |
| Journal | /dailyjournal/journal.htm |
| Design Stage 2 Design Study | A visual reminder of the Design Stage this page is in |
| buttons 1 to 7 | Quick links to all the pages in the design study stage |
| Conduct the Design Study | The title of this page |
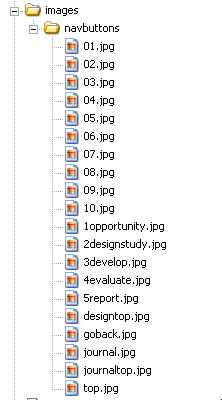
Navigations images are stored in the images folder, in a sub-folder called navbuttons
Figure Navigation Images Directory
If you delete or move these images, navigation will not work correctly. You can replace them with others having exactly the same size in pixels, and the same filenames. Doing this would give a different look to the navigation, without having to edit any of the files.
Activity
Assigned activities
- Step 1. Install the portfolio template
- Step 2. Navigate through the portfolio
- Step 3. Enter information in the portfolio
- Step 4. Publish the portfolio to your course web
Step 01. Install the Design Portfolio Template
The portfolio template is compressed into a zip file that you will need to save to your computer and unzip to the My Webs directory.
Download the template
Follow these steps to save it to the correct location.
- Save the template. Click here and you will get the following screen. Click Ok to begin the download process

Figure File Download Screen
- The next series of windows let you select where you want to save the file

Figure Save As window
- Double-click My Documents in the window. This moves it to the Save in location.

Figure Save As window
- Click the Save button. The designportfolio.zip file will be saved in your My Documents folder.

Figure Download Complete
Unzip the template
The next step is to unzip the portfolio
- Click on the Open Folder button. You will get the following window. Note the the designportfolio.zip file (ignore the u1... series of folders, they will not be on your computer).

Figure Folders window
- Double click on the designportfolio.zip file. A WinZip window will open.

Figure WinZip window
- Click the I Agree button (it may be in a different place) and a new window will open showing the list of files in the zip.

Figure List of zipped files
- Click on the Extract button to begin the unzipping process. the Extract window will open, and you must give the folder location that you wish to extract the files into.

Figure WinZip Extract window
- Note the Extract to: area of the window in the top left corner. You will change that to
C:\Documents and Settings\studentid\My Documents\My Webs
where studentid is your username on the computer. The easiest way to do this is to click on My Webs in the Folders/drives area of the window. That will put the correct path into the Extract to line

Figure Extract window with My Webs selected
- Click on the Extract button. WinZip will begin unzipping the folders and files into My Webs. The info window below will open, showing the unzip progress

Figure WinZip unzip progress
- After a few minutes WinZip will complete its work. When it does, close WinZip
Open the designportfolio web
Now you will start FrontPage, open the My Webs web, and open the designportfolio web that was just placed there
- There are two ways to start FrontPage
- Click Start / Programs / Microsoft FrontPage on the menu
- or, Doubleclick on the program icon on screen
- You should get the following screen
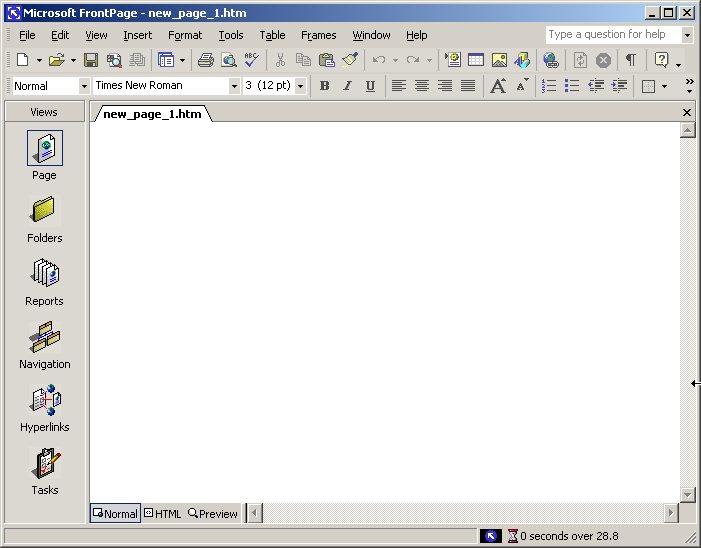
Figure FrontPage Opening Screen
- Now you will open your My Webs Web. Click on File / Recent Webs. My Webs should appear in the list. Click on it to select it
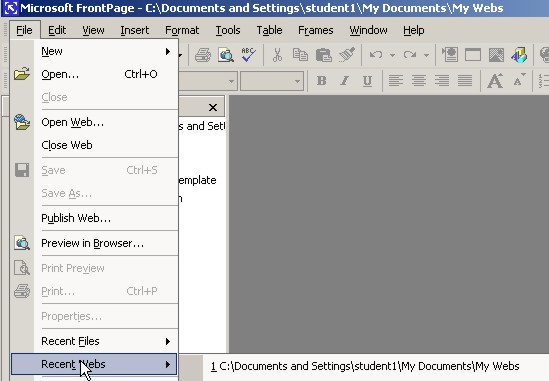
Figure File Open Recent Webs
- The My Webs web will open. You now should have a new folder in My Webs called designportfolio. Note the folder icon that denotes this is a web.

Figure FrontPage Open Web window
- Double-click on the designportfolio web folder. It will open in a new version of FrontPage (FrontPage can have only one web open in each copy of the program)

Figure designportfolio web
Step 2. Navigate through the portfolio
Congratulations on setting up your design portfolio! Now it is time to explore the portfolio and see how it is used. Be careful as you open and close folders and files. FrontPage is a powerful tool. It is easy to delete files, rename them and make changes to the layout of the web that will make it more difficult to use. Remember you will use this as a storage location for all the work you do on your design activity. Good housekeeping will pay of with a high quality design project. You will find more detailed information about how to use the portfolio to record your design activities in the Design Activity.
Some of the files in this web should not be modified. Some are there expressly for you to enter your information. Eventually you will want to add pages, import images, and perhaps audio, video and animation files. For now, a simple exploration will suffice.
If you closed the web and/or shut down FrontPage, restart FrontPage and open the designportfolio web.
- Click on the File menu, and scroll down the list until you see the sub-menu item Recent Web. Select designportfolio from the list and it will open
- After it opens, stretch the folder list to the right as shown below

Figure Folder List
Take note of the list of folders and files
- c:\Documents and Settings\student1\My documents\My Webs\designportfolio is the location of the designportfolio web on you computer. This folder is known as the root of the web, since all folders and files that are part of the web must be inside this folder
- _private is created by FrontPage. You will not be using it, but leave it without change
- images is also created by FrontPage. It is generally used for images for the web. You will likely create additional folders in each of the desigstage folders for images, audio, video, and so on
- designstage1 (and all the other designstage folders) is used to store folders and files related to that designstage
- dailyjournal contains folders and files that you create as part of your day journal for design.
- style.css is a style sheet that is referenced in each of the pages in the web. You will not need to modify this page. Any changes to its contents will dramatically affect how all pages look. Removing the file will prevent pages form loading in the browser unless the html reference is removed from all pages.
- index.html is the opening page of the web. You will not need to modify this page. It is automatically opened by a web browser when you open this web. Most likely, this file is called index.htm on your computer. some computers may even call it Default.htm, but that will not affect its operation. When you publish to the web server FrontPage will automatically rename it to suit how the server is configured.
Time to explore the contents.
- Find the Views Pane to the left and click on the Folders icon. You should get the following

Figure Folder View
- Try clicking on designstage1. The contents should be displayed to the right. The figure below shows the contents of desigstage1.

Figure Contents of designstage1
- Notice the 3 files.
- d1-part1.htm (short for designstage1-part1) and d1-part2.htm are files you will open to add your content.
- designstage1.htm is the index file for this folder. You will not need to edit it
- Click on each folder in succession. The tables below show you which files you will eventually need to open and edit and which ones you should not edit
| Folder | File | Add your content or edit file |
| ..\designportfolio | index.html (index.htm, Default.htm) | no |
| style.css | no | |
| _private | none | no |
| dailyjournal | journal | yes |
| desigstage1 | d1-part1.htm | yes |
| d1-part2.htm | yes | |
| designstage1.htm | no | |
| designstage2 | d2-part1.htm | yes |
| d2-part2.htm | yes | |
| d2-part3.htm | yes | |
| d2-part4.htm | yes | |
| d2-part5.htm | yes | |
| d2-part6.htm | yes | |
| d2-part7.htm | yes | |
| designstage2.htm | no | |
| designstage3 | d3-part1.htm | yes |
| d3-part2.htm | yes | |
| d3-part3.htm | yes | |
| d3-part4.htm | yes | |
| designstage3.htm | no | |
| desigstage4 | d4-part1.htm | yes |
| d4-part2.htm | yes | |
| d4-part3.htm | yes | |
| d4-part4.htm | yes | |
| d4-part5.htm | yes | |
| desigstage4.htm | no | |
| designstage5 | d5-part1.htm | yes |
| d5-part2.htm | yes | |
| d5-part3.htm | yes | |
| d5-part4.htm | yes | |
| d5-part5.htm | yes | |
| designstage5.htm | no |
The final folder, images, has a subfolder called navbuttons. All of these images are used for the navigation buttons in the web. Any changes to them may cause the navigation to not work or to work differently than expected.
| Folder | Sub-folder | Files | Edit or change |
| images | none | none | add images for your content |
| images | navbuttons | 01.jpg | no |
| 02.jpg | no | ||
| 03.jpg | no | ||
| 04.jpg | no | ||
| 05.jpg | no | ||
| 06.jpg | no | ||
| 07.jpg | no | ||
| 08.jpg | no | ||
| 09.jpg | no | ||
| 1opportunity.jpg | no | ||
| 2desigstudy.jpg | no | ||
| 3develop.jpg | no | ||
| 4evaluate.jpg | no | ||
| 5report.jpg | no | ||
| desigtop.jpg | no | ||
| goback.jpg | no | ||
| journal.jpg | no | ||
| journaltop.jpg | no | ||
| top.jpg | no |
Next step is exploring files
Step 3. Enter information in the portfolio
You should have FrontPage open and the designportfolio web open. If not please open it now.
- Go to the Views pane and click on the Page icon. You should get the folder list as shown below. Click on the plus sign in front of the dailyjournal folder
Figure Folder List
- The folder will expand to show its contents. There will be only one file - journal.htm
Figure File list for dailyjournal
- Double-click on journal.htm and the file will open in the Edit Pane. You may have to adjust window and pane sizes to see the entire file.

Its time to examine the journal.htm file and determine how to use it.
- Note that the page has two tables.
- The first table is 600 pixels wide and contains two pieces of information
- Daily Journal (formatted with heading 4)
- List of Entries (formatted with heading 1)
- The second table is 600 pixels wide and has two columns with multiple rows
- each column has a heading (formatted with heading 4)
- below Date heading is an entry called date-here. Each time you make a new entry, replace this text with your date
- below each Comments heading there is an entry called delete this and put your comments here which should be self explanatory
- When you run out of rows, place your cursor in the lower right cell and press the tab key. That will create a new row. Repeat as often as desired.
- The first table is 600 pixels wide and contains two pieces of information
Now you are ready to make your first entry.
- Go to the first row. Select the text date-here and replace with the current date. The format is not critical, but use the same one every time (for example, Sept 15, 02). Put an entry in the Comment column to the effect that you have completed installation of the designportfolio.
- Save your file
- click on File / Save
- or click on the Save icon

That's all the entries for now. On to Step 4
Step 4. Publish the portfolio to your course web
This is an activity you will do regularly. The best practice is to do this after each session that you add new content, or edit content. The server that you will publish to, http://student.cdli.ca, has its files backed up regularly. Publishing regularly means that if your computer crashes, all your work can be recovered from the server.
You web on the server has a userid and password. You need them to open the web in FrontPage or in a web browser. Because of the way security works in the server, you can only used Internet Explorer to browse the web. Only you and your teacher can see your work. If you give your id and password to others, they can not only read your work, but also open and edit it.
The first time you publish, you have to tell FrontPage where you want the web to be sent. After the first time, you only need to click one button.
There are several things you need to know about publishing
- the first time you publish, all folders and files are published
- each subsequent time you publish, FrontPage compares the folders and files on your computer to those on the server you are publishing to and only publishes the changes
- if you edit a file, the new version will be published overwriting the one on the server.
- if you add a file it will be added to the server
- if you delete a file it will be deleted from the server. FrontPage may ask you to confirm the deletion
Before you can complete this activity, you will need to know the address of your web, and your username and password.
- The address will be of the format
http://student.cdli.ca/02ct23104-1/studentname-dp
where studentname is your web name and dp stands for designportfolio. Some students may have course number 02ct23104-2. The -2 just indicates a different teacher.
First time publish
- Click on File / Publish Web
Figure File Publish Web
- The Publish Destination window will open. Enter the information for your web.
The location will be supplied by your instructor, in the format http://url
You will also be given a userid and password, which you will need to enter
Subsequent Publishing
For subsequent publishing, click the Publish Web button ![]() and click OK. Supply your userid and password and the web will be published. Note that it will only send changes since your last update. If you delete files, they will be deleted off the destination web as well.
and click OK. Supply your userid and password and the web will be published. Note that it will only send changes since your last update. If you delete files, they will be deleted off the destination web as well.
