
Learning Resources
Lesson
Purpose of the course portfolio
The Course Portfolio is a tool used by students. It
- is a record of all the lesson activities, unit project activities and assignments completed during the course
- provides a structure for saving information and making it available to your teacher for review and evaluation
- review is useful for teachers and students because it lets the teacher see if students are having difficulty with a concept and enables them to help solve problems
- provides a very convenient way for students to save their work on the computer and publish it in a location that the teacher has immediate access to. This eliminates the need to send email attachments and so on
- includes any work completed by the student
- hand written drafts, or drawings (scanned)
- all digital work, including working drafts (text, video, audio, and so on)
- any other work that your teacher would like to review, that you need help with, or that will be assessed towards you final grade
Components of the course portfolio
Organization
The portfolio is a web template used in Microsoft FrontPage. The template has all the essential web pages built, along with all the navigation structure to make it work. It has the following organization for navigating through the pages
- Record of work for each unit
- Unit 1
- Activities (empty pages for up to 20 activities)
- Assignments (empty pages for up to 8 assignments)
- Unit 1 Project (empty pages for each of 4 parts)
- Unit 2
- Activities (empty pages for up to 20 activities)
- Assignments (empty pages for up to 8 assignments)
- Unit 1 Project (empty pages for each of 4 parts)
- Unit 3
- Activities (empty pages for up to 20 activities)
- Assignments (empty pages for up to 8 assignments)
- Unit 1 Project (empty pages for each of 4 parts)
- Unit 4
- Activities (empty pages for up to 20 activities)
- Assignments (empty pages for up to 8 assignments)
- Unit 1 Project (empty pages for each of 4 parts)
- Unit 5
- Activities (empty pages for up to 20 activities)
- Assignments (empty pages for up to 8 assignments)
- Unit 1 Project (empty pages for each of 4 parts)
- Unit 1
- Journals and other records
- Journal Entries
- An entry page for each month from September to June
- Special Projects
- Entry pages for 4 special projects
- Journal Entries
Template Structure
The template consists of folders and files (web pages).
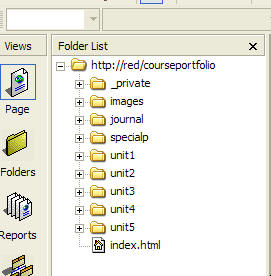
- The figure below shows the folder structure. Clicking on index.html in the image will open the corresponding file in the template. From there you can open any of the others.
Figure courseportfolio template
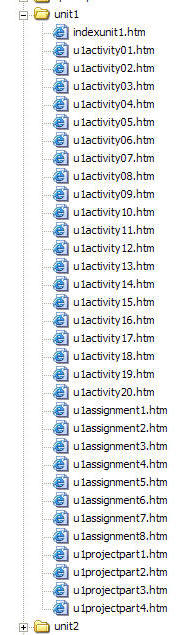
- The next figure shows all the files in the unit1 part of the template. indexunit1.htm is the list of files for the unit. This is not a file you would normally edit. All the files that start with u1 are the ones used to enter your information. Unit 2 files commence with u2, unit 3 with u3, and so on.
Figure courseportfolio unit1 files
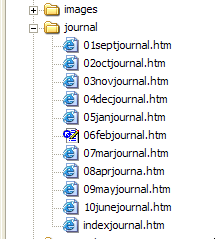
- The next figure shows the journal files. indexjournal.html is the one file you will not need to edit. Each of the others is a table for journal entries during each month.
Figure courseportfolio journal files
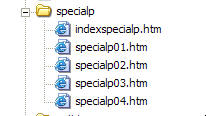
- Special projects, shown next, has an indexspecialp.htm file that you will not need to edit. If you do any special projects, start with specialp01.htm
Figure courseportfolio special projects files
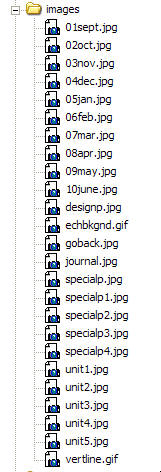
- This web uses a number of images for navigation. They are stored in the images folder. Moving, renaming, or altering them may cause problems with navigation when the portfolio is opened in a browser.
Figure courseportfolio navigation images
Navigating the course portfolio in a web browser
- The next figure shows the opening screen for the courseportfolio. Note the navigation buttons for the Unit pages on the left and the Journal, Special Projects and Design Portfolio on the right. Can you match the images in the list above with those in the screens below? You will have to give the Design Portfolio an active link later on when you get the course portfolio and the deign portfolio set up on your computer .
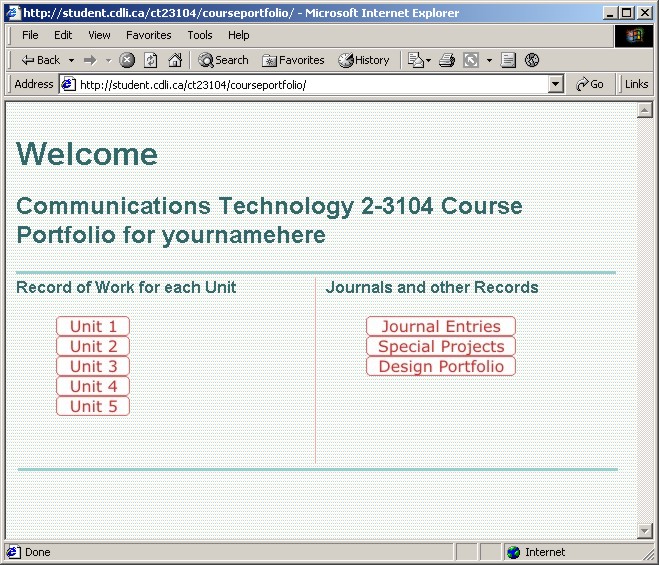
Figure Navigation Images courseportfolio main screen
- Clicking on Unit 1 jumps to the next screen, shown in the next figure. It shows the links to the list of files in the Unit 1 folder. This is not a page that you will normally edit. Go Back should be obvious.
![]()
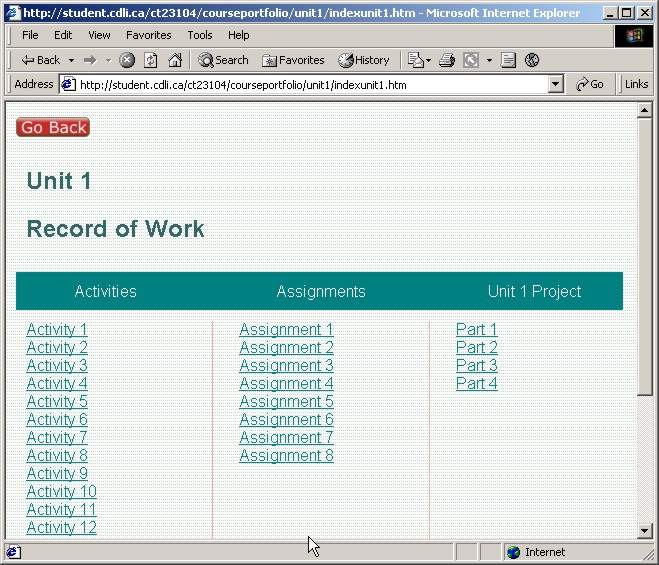
Figure Links to files in courseportfolio unit 1
- Clicking on any file in the list will give you a screen like the following. This one happens to be Unit 1 Activity 1. To use, you just delete the text put your stuff here and, well, put your stuff there! Almost all the files to which you will add content look like this one
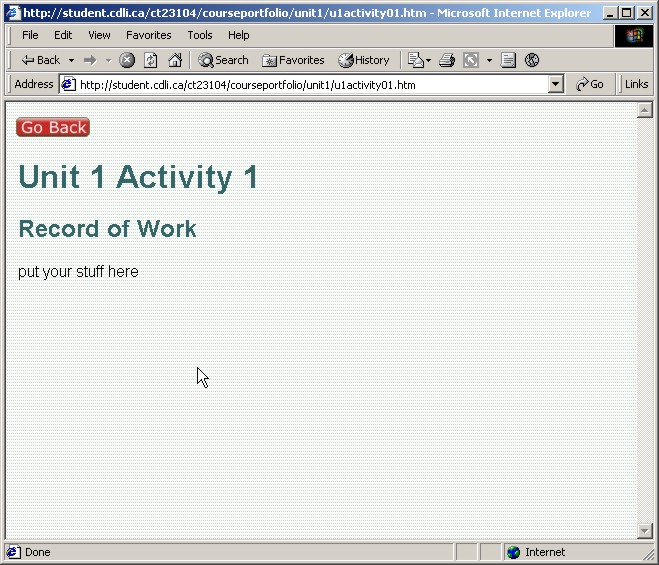
Figure Typical data entry page in courseportfolio
- The next figure shows the main page with links to each month's page for the Day Journal
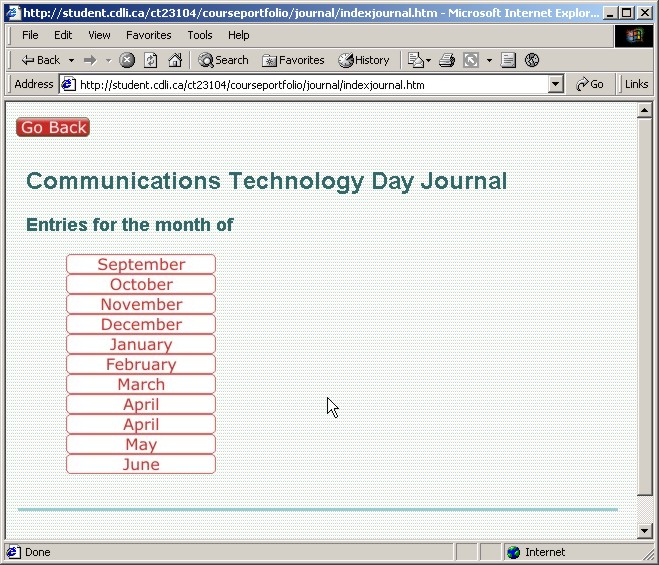
Figure Day Journal list of monthly entries in courseportfolio
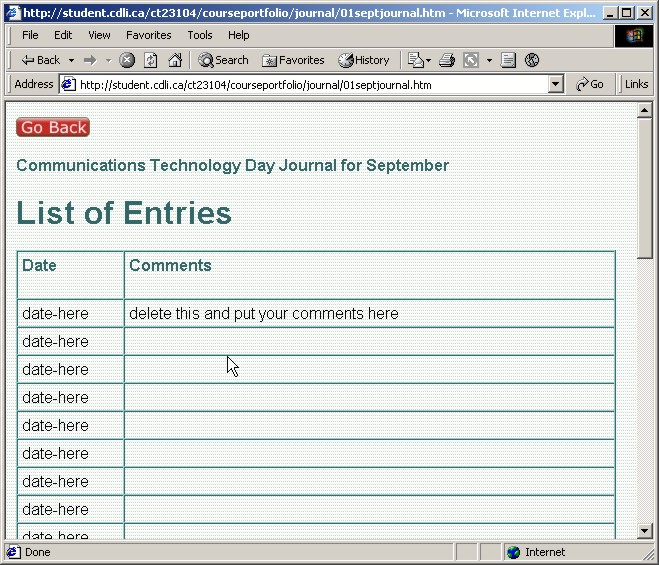
- The next figure shows a typical Day Journal entry page. There is one page for each month, with about 35 rows in each table. While that should be more than enough, there is an instruction in the last row for creating additional rows.
Activity
Assigned activities
- Step 1. Install the course portfolio template
- Step 2. Navigate through the portfolio
- Step 3. Enter information in the portfolio
- Step 4. Publish the portfolio to your course web
Step 01. Install the Course Portfolio Template
The portfolio template is compressed into a zip file that you will need to save to your computer and unzip to the My Webs directory.
Download the template
Follow these steps to save it to the correct location.
- Save the template. Click here and you will get the following screen. Click Ok to begin the download process
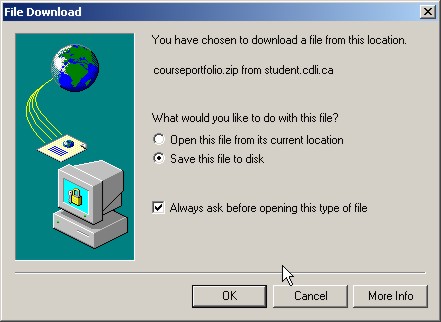
Figure File Download Screen
- The next series of windows show you what to expect when you select where you want to save the file. You will be saving it to
c:\Documents and Settings\studentid\My Documents\
where studentid is you user name of the computer. Most likely you will get the following screen
Figure Save As window
- Double-click on My Documents in the window. This moves it to the Save in location. Ignore all the u1projpart... folders in the image below. They will not be on your computer.
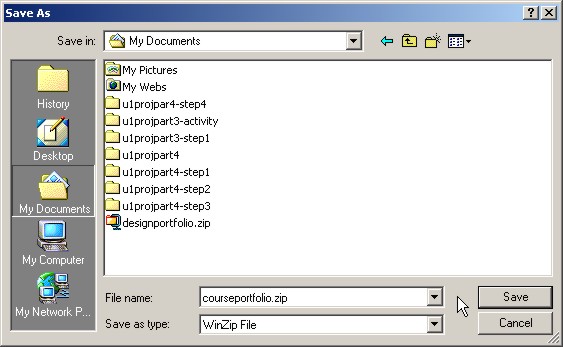
Figure Save As window
- Click the Save button. The courseportfolio.zip file will be saved in your My Documents folder. and you will get the confirmation screen shown below. Do not click the close button

Figure Download Complete
Unzip the portfolio template
The next step is to unzip the portfolio
- Click on the Open Folder button. You will get the following window. Note the the courseportfolio.zip file (ignore the u1... series of folders, they will not be on your computer).
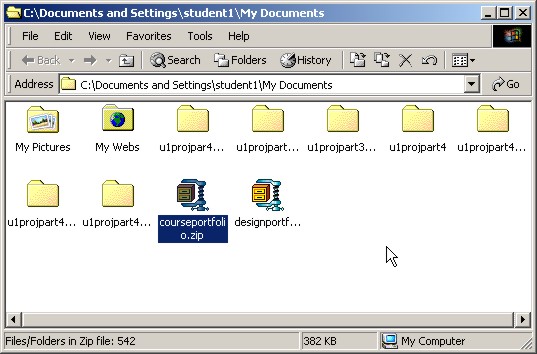
Figure Folders window
- Double click on the courseportfolio.zip file. A WinZip window will open.
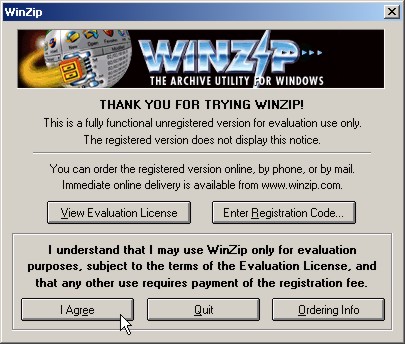
Figure WinZip window
- Click the I Agree button (it may be in a different place) and a new window will open showing the list of files in the zip.
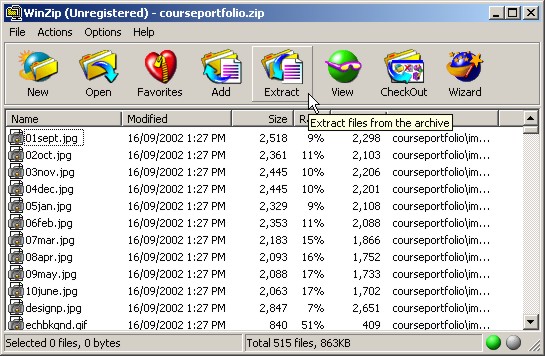
Figure List of zipped files
- Click on the Extract button to begin the unzipping process. The Extract window will open, and you must give the folder location that you wish to extract the files into. The default may be
C:\Documents and Settings\studentid\My Documents\
You will see your user name instead of studentid
You will change that to
C:\Documents and Settings\studentid\My Documents\My Webs
(again with your actual user name) - Follow the procedures after the next screen to change to the correct location
Figure WinZip Extract window
- Note the Extract to: area of the window in the top left corner. You will change that to
C:\Documents and Settings\studentid\My Documents\My Webs
where studentid is your username on the computer. The easiest way to do this is to click on My Webs in the Folders/drives area of the window. That will put the correct path into the Extract to line

Figure Extract window with My Webs selected
- Click on the Extract button in the top right corner. WinZip will begin unzipping the folders and files into My Webs. The info window below will open, showing the unzip progress
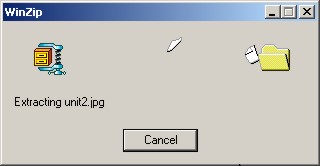
Figure WinZip unzip progress
- After a few minutes WinZip will complete its work and will return to the list of files window. When it does, close WinZip
Open the courseportfolio web
Now you will start FrontPage, open the My Webs web, and open the courseportfolio web that was just placed there. The following procedure will show you how to navigate to the new web and open it using FrontPage
- There are two ways to start FrontPage
- Click Start / Programs / Microsoft FrontPage on the menu
- or, Doubleclick on the program icon on screen
- You should get the following screen, or very similar.
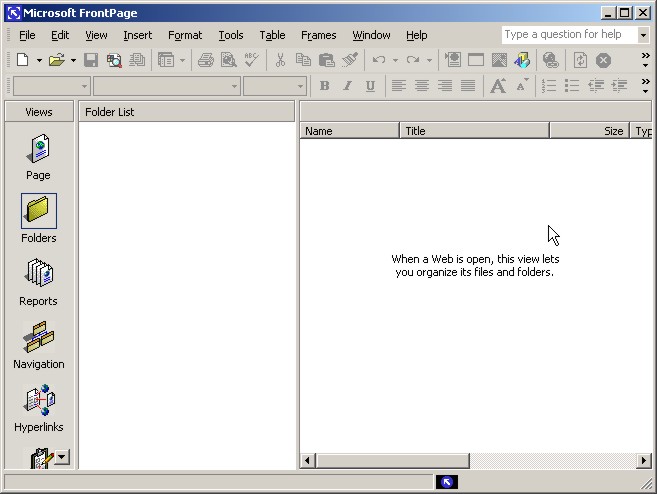
Figure FrontPage Opening Screen
- Now you will follow the steps to get to and open your My Webs Web. Click on the File menu item to get the list of options. You will see on called Open Web.
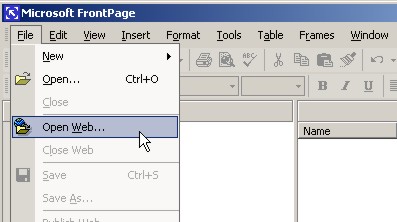
Figure File Open Web
- Click on Open Web. You should get the following window. Note that in this example student1 is highlighted. You will need to find your user name and double-click on it
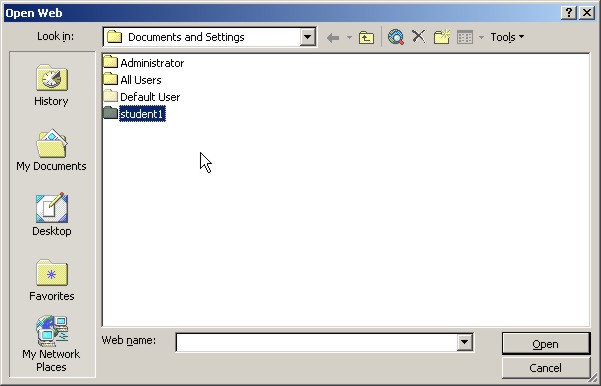
Figure FrontPage Open Web window
- Double-clicking on your user name should open the following window (with your user name in the Look in line).
- Next double-click on My Documents
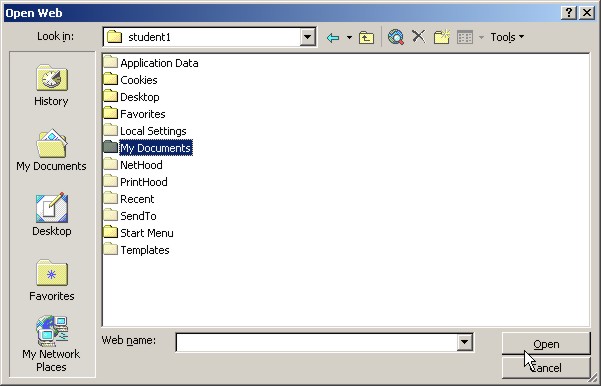
Figure FrontPage Open Web window
- The next window will have the folder My Webs in it. That will be your next selection. Double-click on it as well. (just ignore the extra folders in the example below) You should notice the different folder icon that My Webs has. It designates that this is a web folder, reminding you to not modify it with Windows Explorer.

Figure FrontPage Open Web window
- Ok, this will be the last one. You should now see the following window with My Webs in the Look in line. You should also see a web folder for courseportfolio. Yours will not have designportfolio yet. You will add that one in Part 4 of this project.

Figure FrontPage Open Web window
- Double-click on the courseportfolio web folder. It will open a new FrontPage window, listing the folders in courseportfolio. You will need to click on the Open button in the lower right.

Figure courseportfolio web ready to be opened
- After you click the Open button, FrontPage will open the courseportfolio web, shown below.
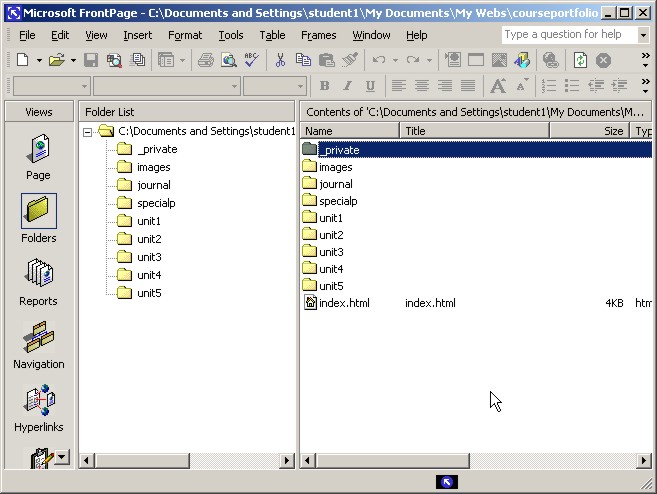
Figure courseportfolio web opened and ready for use
Congratulations! You have installed your course portfolio web and opened it for the first time.
Ready to move to Step 2?
Step 2. Navigate through the portfolio
Congratulations on setting up your course portfolio! Now it is time to explore the portfolio and see how it is used. Be careful as you open and close folders and files. FrontPage is a powerful tool. It is easy to delete files, rename them and make changes to the layout of the web that will make it more difficult to use. Remember you will use this as a storage location for all the work you do in your course. Good housekeeping will pay of with high quality reports.
Some of the files in this web should not be modified. Some are there expressly for you to enter your information. Eventually you will want to add pages, import images, and perhaps audio, video and animation files. For now, a simple exploration will suffice.
- If you closed the web and/or shut down FrontPage, restart FrontPage and open the courseportfolio web. If you can't find it, follow the instructions at the end of Step 1.
- You should get the following screen. FrontPage will likely be in the Folders view (its highlighted in the views pane on the left). If not, click on it and you will get this view.
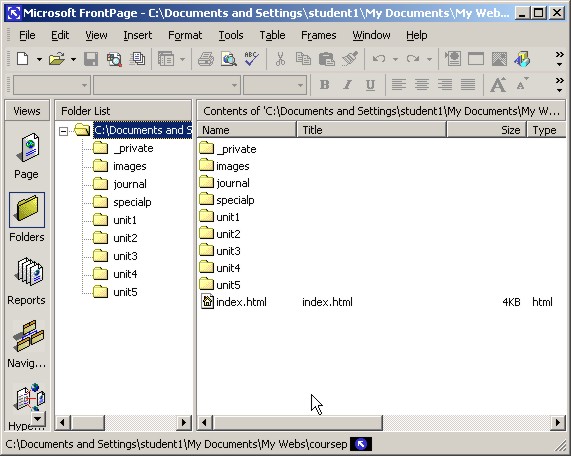
Figure Folder List for courseportfolio
Take note of the list of folders and files
- c:\Documents and Settings\student1\My documents\My Webs\courseportfolio is the location of the courseportfolio web on you computer. This folder is known as the root of the web, since all folders and files that are part of the web must be inside this folder
- _private is created by FrontPage. You will not be using it, but leave it without change
- images is also created by FrontPage. It is generally used for images for the web. You will likely create additional folders in each of the unit folders for images, audio, video, and so on
- journal contains folders and files that you create as part of your day journal for the course.
- specialp contains files that are used to record information about any special projects you may wish to use
- unit1 (and all the other unit folders) is used to store folders and files related to that unit
- index.html is the opening page of the web. You will not need to modify this page. It is automatically opened by a web browser when you open this web. Most likely, this file is called index.htm on your computer. some computers may even call it Default.htm, but that will not affect its operation. When you publish to the web server FrontPage will automatically rename the file to suit how the server is configured.
Time to explore the contents.
- Click once on the images folder. You will see the list of navigation images that are used in the portfolio. You should not modify or rename them. Doing so may affect their operation when you are viewing the web in a browser
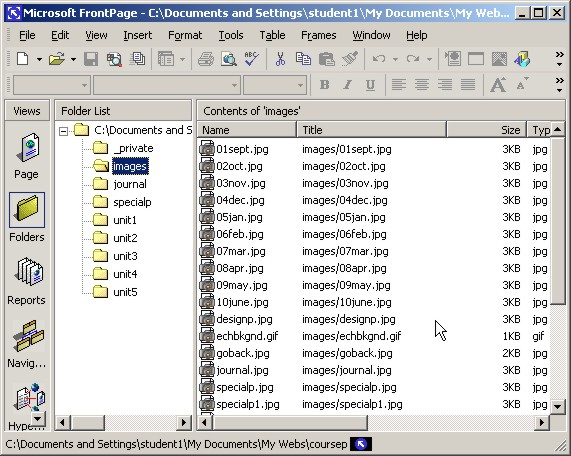
Figure Images Folder View
- Try clicking on journal next. As you can see, there are 11 files. indexjournal.htm is the opening page and it has the nav buttons to connect to the journal pages. You will not need to edit this page. Journal pages are numbered (01, 02, and so on) and named (septjournal, ...). The numbering makes them sort in the correct order when you open the folder in FrontPage. The names are there so that you know which month you are opening so that you can make entries.
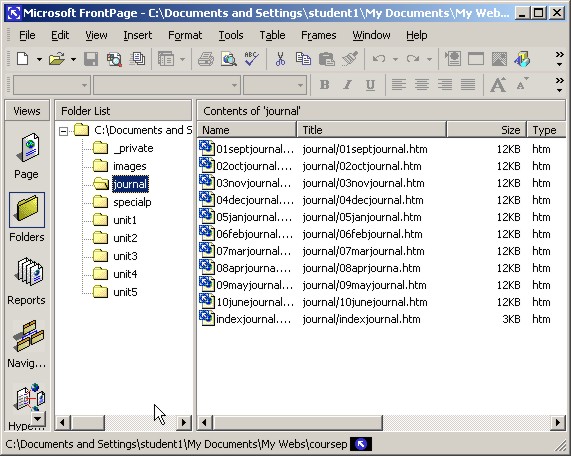
Figure Contents of journal folder
- Click on the specialp folder next. You will find 5 files. indexspecialp.htm is the list of files that the browser will display. You will not need to edit it. specialp01.htm and similarly named files are the ones you will open and edit if you complete a special project
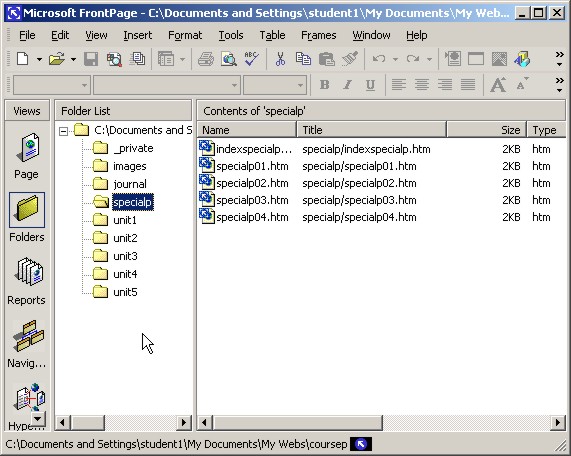
Figure Contents of specialp folder
- Click on any one of the the unit folders next. You will find 33 files. This example is for Unit 1. The files are
- indexunit1.htm. It is the list of files that the browser will display. You will not need to edit it.
- 20 files labelled u1activity01.htm to u1activity20.htm. You will need to open and edit some of these files (pages) as you do the activities in each unit. You will use only the ones that you need (one page per activity)
- 8 files labelled u1assignment1.htm to u1assignment8.htm. You will need to open and edit some of these files (pages) if you complete any assignments in this unit. As before you will use only those required to do assignments
- 4 files called u1projectpart1.htm to u1projectpart4.htm. You will need to open and edit some of these files (pages) when you complete the unit project (which has 4 parts)
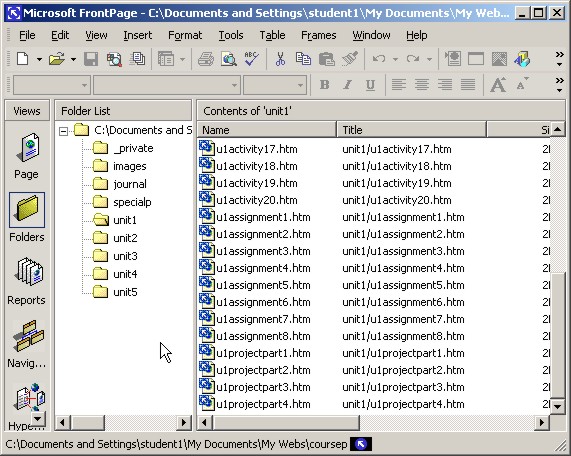
Figure Typical unit files in courseportfolio web
Ready to move to Step 3 and make your first content entries in the portfolio? Click on 3 below to get there.
Step 3. Enter information in the portfolio
You should have FrontPage open and the courseportfolio web open. If not please open it now.
- Go to the Views pane and click on the Page icon. You should get the folder list as shown below. Click on the plus sign in front of the journal folder
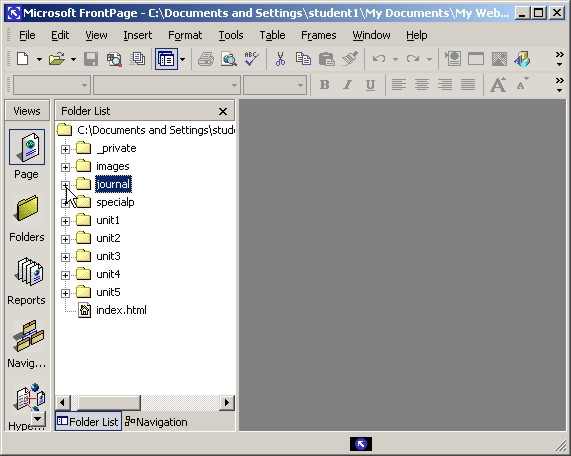
Figure journal folder
- The folder will expand to show its contents. YOu should see the following screen. You will be entering information in the September page.
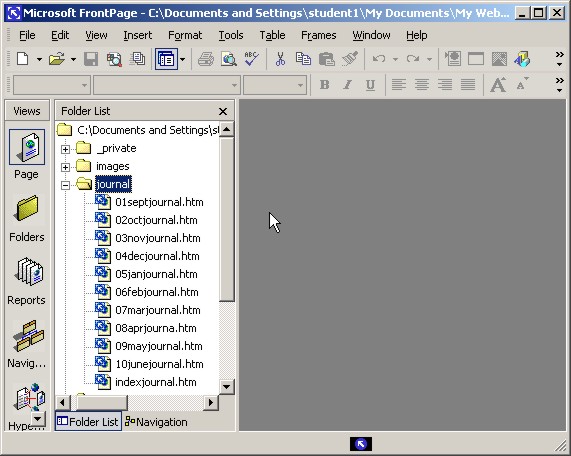
Figure journal file List
- Double-click 01septjournal.htm and the page will open in the right pane. You may have to adjust window and pane sizes to see the entire file as shown next
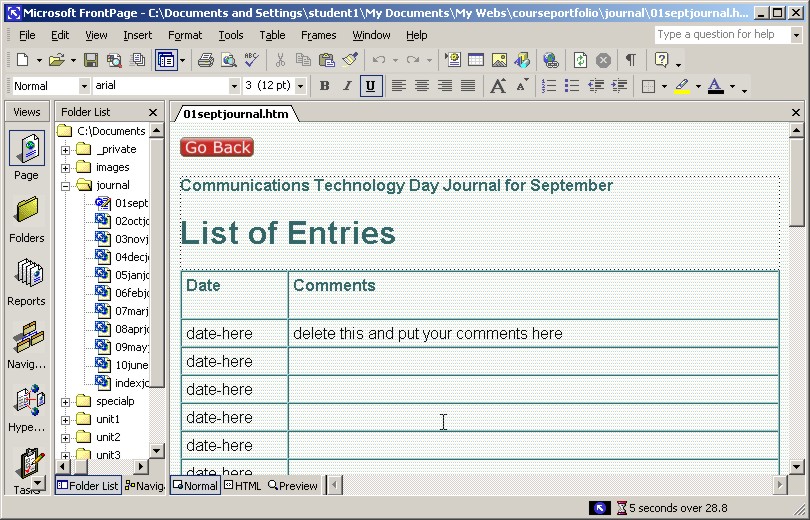
Figure September journal data entry page
Its time to examine the 01septjournal.htm file and determine how to use it.
- The page consists of
- a Go Back navigation button which should not be changed
- a one cell table holding the headings
- Communications Technology Day Journal for September (formatted as a Heading 4)
- List of Entries (formatted as a Heading 1)
- A 2 column, 36 row table with
- headings Date and Comments in the first row (formatted as a Heading 4)
- date-here at the beginning of each subsequent row (to be replaced with the date you make an entry)
- delete this and put you comments here in the first data entry cell (you know what to do with this)
Now you are ready to make your first entry.
- Go to the first row. Select the text date-here and replace with the current date. The format is not critical, but use the same one every time (for example, Sept 14, 02). Put an entry in the Comment column to the effect that you have completed installation of the courseportfolio. Include any other entries for activities completed to date
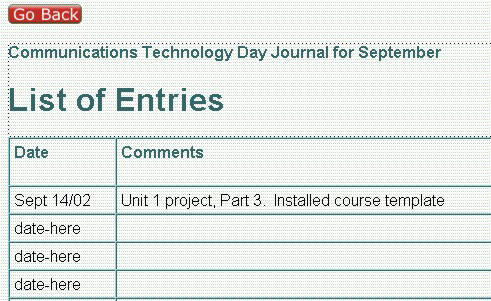
Figure September journal sample first data entry
- Save your file
- click on File / Save
- or click on the Save icon

Congrats! You have made your first of many updates to the portfolio.
Ready to move to Step 4 and Publish your web? Click on 4 below
Step 04. Publish the portfolio to your course web
This is an activity you will do regularly. The best practice is to do this after each session that you add new content, or edit content. The server that you will publish to, http://student.cdli.ca, has its files backed up regularly. Publishing regularly means that if your computer crashes, all your work can be recovered from the server.
You web on the server has a userid and password. You need them to open the web in FrontPage or in a web browser. Because of the way security works in the server, you can only used Internet Explorer to browse the web. Only you and your teacher can see your work. If you give your id and password to others, they can not only read your work, but also open and edit it.
The first time you publish, you have to tell FrontPage where you want the web to be sent. After the first time, you only need to click one button.
There are several things you need to know about publishing
- the first time you publish, all folders and files are published
- each subsequent time you publish, FrontPage compares the folders and files on your computer to those on the server you are publishing to and only publishes the changes
- if you edit a file, the new version will be published overwriting the one on the server.
- if you add a file it will be added to the server
- if you delete a file it will be deleted from the server. FrontPage may ask you to confirm the deletion
Before you can complete this activity, you will need to know the address of your web, and your username and password.
- The address will be of the format
http://student.cdli.ca/02ct23104-1/studentname-cp
where studentname is your web name and cp stands for courseportfolio (you will use dp for designportfolio). Some students may have course number 02ct23104-2. The -2 just indicates a different teacher.
First time publish
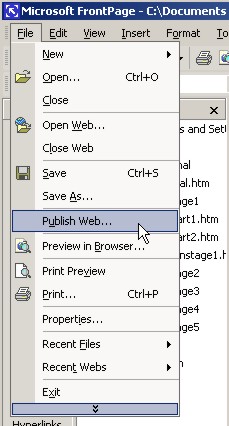
- Click on File / Publish Web
Figure File Publish Web
- The Publish Destination window will open. Enter the information for your web.
The location will be supplied by your instructor, in the format http://url
You will also be given a userid and password, which you will need to enter
Subsequent Publishing
For subsequent publishing, click the Publish Web button ![]() and click OK. Supply your userid and password and the web will be published. Note that it will only send changes since your last update. If you delete files, they will be deleted off the destination web as well.
and click OK. Supply your userid and password and the web will be published. Note that it will only send changes since your last update. If you delete files, they will be deleted off the destination web as well.