| Intermediate Technology Education | Control Technology | Design Stage 2 | Topic 6 | Optional Activity 4 |

Introduction to Computer Control

Modify the Servo Motor

Note:  Perform this step only if your motors have an extra gear.

Some of the geared servo motors that come with the control kit have to be modified for continuous rotation. Servo motors normally have 180 degrees of rotation but by changing the main drive gear they can be made to rotate in a complete revolution. If your servo motors came with an additional gear, you will need to make this change. If you are not sure, simply rotate the motor shaft by hand. If the motor stops without making a full turn, it needs to be modified.

The modification consists of replacing the main drive gear, which has a plastic "stop", with a drive gear which will allow continuous rotation. The two gears are shown in the next illustration
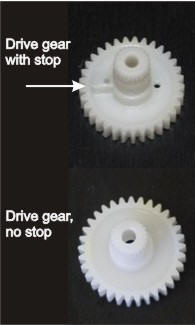

Figure Drive gears

Start by taking the 4 long screws out of the bottom of the motor case. Make sure you hold the case securely as you don't want the gear train to fall out. When the screws are removed, leave the bottom in place and remove the top of the case.


Figure Long screws removed from motor case

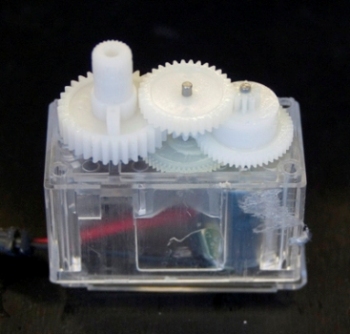
Figure Case top removed, drive gear on the left

Next lift off the small middle gear and then the drive gear. Make sure the brass ring stays in place.


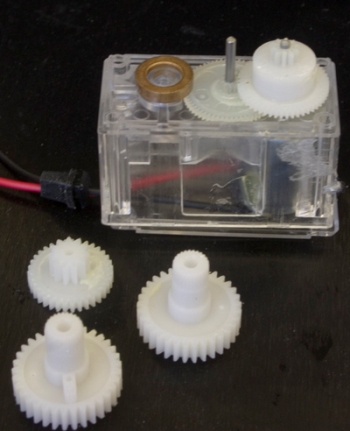
Figure Gears removed, brass ring left in place

Reassemble in reverse order. Start with the replacement drive gear. Make sure it fits snugly around the brass ring. Then replace the smaller centre gear as shown below.


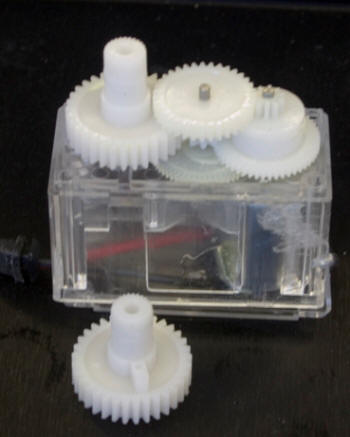
Figure Replacement gear in place

Finish the modification by fitting the motor top and replacing the 4 long screws.


Figure Completed modification

Install the Phidget Library

If you are using Window XP or 2000, the person installing the library must be logged in as administrator or have administrator privilege.

If your computer is protected by a program such as Deep Freeze, this may have to be disabled. Check with the person who looks after the school network.

The Phidget library can be installed by clicking on the link below and reading the instructions that follow.

Instructions

  • When you click the Phidget library link, a message will appear similar to the following (this is for windows XP but it should be similar for older operating systems). Click Run.

Figure Install Message
  • You may see the next message, asking if you really want to run software from an unknown publisher. Click Run.

Figure Unknown Publisher Message
  • If you are successful, the Phidget Library Setup Wizard shown below will open. Click Next.

Figure Phidgets Setup Wizard
  • A Select Installation Folder will open. You can click Next to install the library in the default location.

Figure Select Installation Folder Window
  • A Confirm Installation screen will open. Again, click Next.

Figure Confirm Installation Window
  • You should see a status bar as the library installs. When it is finished, an Installation complete screen will open. Click close to finish the installation.

Figure Installation Complete Window


Install the Phidget Monitor

The Phidget monitor is a simple executable file. All that is needed is to downlaod the file and place it somewhere convenient such as you desk top. The link below can be used to do this. Read the instructions that follow before doing it.

Instructions

  • When you click the link below, a screen similar to the following will open. This time click Save.

Figure PhidgetMonitor Run/Save Options
  • The following window will open. Select a folder to save the file and click Save. (In this example it is saved to the desktop.)

Figure Save File Requestor Window
  • When the status bar indicates that the file has been downloaded, click Close. The Phidget monitor is ready to use.

Figure Download Complete Window

Note. Make sure you close the Phidget monitor when running any other control software when doing the activities. If not, the two will interfere with each other.