| Intermediate Technology Education | Energy and Power Technology | Pre-Design | Topic 3 | Optional Activity 1 |
Using a Multimeter
- Read units of electrical measure
- Identify types of multimeters
- Identify the functions of a multimeter
- Identify the major settings and determine how to set the correct range for the system under test
- Use the meter to measure electrical resistance
- Use the meter to measure voltage
- Use the meter to measure electrical current
Safety Caution
Electricity, even at low voltages and currents, can be problematic if not handled properly. Use of a multimeter requires access to bare contacts on the device being measured. Do not engage in any electrical measurement procedure without first having the setup inspected by your teacher.
Units of Electrical Measure
As you probably know by now, the common units of electrical measure are
- Volts
- Ohms
- Amps
This activity focuses only on measuring these quantities.
You may also have noticed that a number of prefixes are used with these units to denote larger or smaller quantities. The following table shows the most common terms and their meanings. Note which abbreviations are capitalized and which are not.
| Prefix | Multiplier | Symbol | Example |
|---|---|---|---|
| tera | 1,000,000,000,000 | T | TV (teravolt) |
| giga | 1,000,000,000 | G | GΩ (gigaohm) |
| mega | 1,000,000 | M | MΩ (megaohm) |
| kilo | 1,000 | k | kV (kilovolt) |
| hecto | 100 | h | Not used |
| deca | 10 | da | Not used |
| none | 1 | Amp | |
| deci | 0.1 | d | Not used |
| centi | 0.01 | c | Not used |
| milli | 0.001 | m | mA (milliamp) |
| micro | 0.000001 | μ (mu) | μF (microfarad) |
| nano | 0.000000001 | n | nV (nanovolt) |
| pico | 0.000000000001 | p | pF (picofarad) |
Table. Common Prefixes
As the table indicates, hecto, deca, deci, and centi are not commonly used for electricity measurements. They could be used, but people seem to prefer to use kilo and milli to replace the others. In practical terms this is not an issue and results in fewer terms to remember. Examples of use are
.001 A would be written / read as .001 A or 1 milliamp
.01 A would be written / read as .010 A or 10 milliamps
.1 V would be written / read as .100 V or 100 millivolts
10 Ω would be written / read as 10 Ω (ohms)
125 Ω would be written/read as 125 Ω
1200 V would be written / read as 1.2 kV
Types of Multimeters
Multimeters come in a variety of sizes and shapes, but they all have common functions. A few examples are shown below. The first model is the one used in this course.
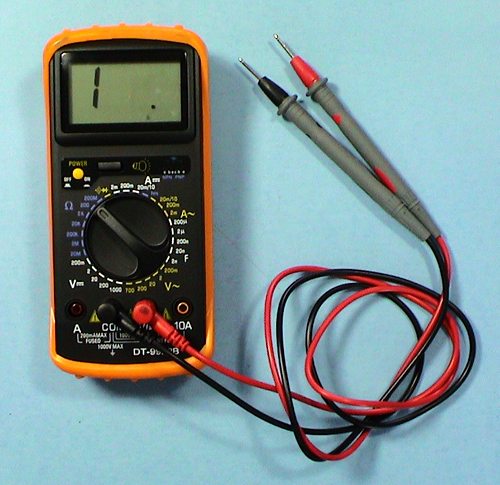
Figure: This Digital Multimeter is used in this course.
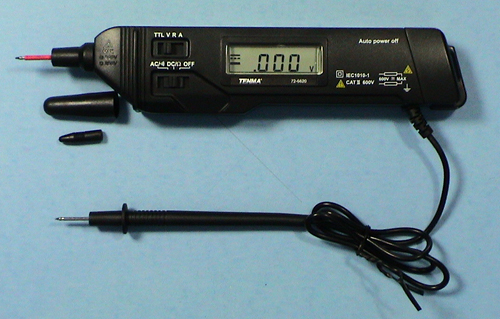
Figure: A probe-style Multimeter.
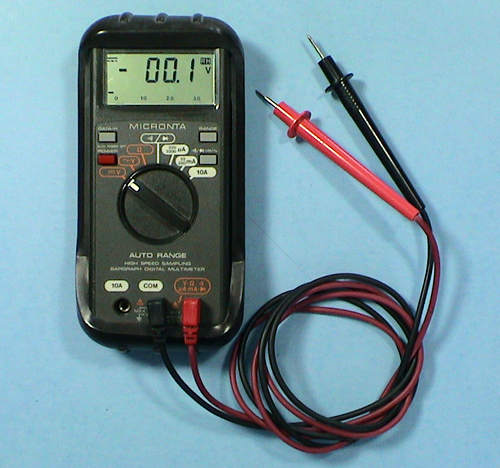
Figure: This digital Multimeter is similar, but has a different layout for the selector switch
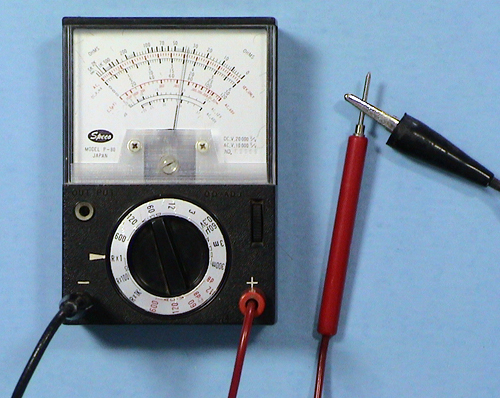
Figure: This is an analogue multimeter circa 1972. It has the same functions, but you have to read the appropriate scale in interpret the reading.
Functions of the Multimeter
Multimeters are used to take different types of electrical readings, hence the name multimeter. All multimeters can be set to measure
- EMF, measured in volts (symbol V)
- Current, measured in amperes (amps) (symbol A)
- Resistance, measured in ohms (symbol Ω)
In addition to the 3 basic measurements, multimeters often are built with additional functions, including one or more of the following
- Measure capacitance in farads (symbol F)
- Test diodes
- Test transistors
The meter used in this course has all the functions listed above.
Setting the Multimeter for Use
A closer look at the selector switch on the multimeter used in this course reveals that the selections are divided into groupings, each a different colour. The image below identifies settings for measuring resistance, AC and DC voltage, and AC and DC current.
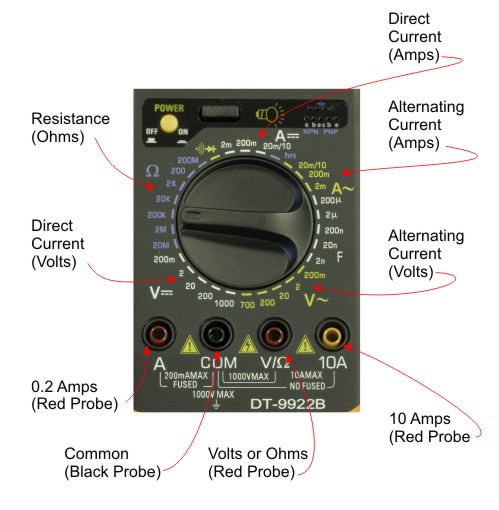
Figure. Multimeter Selector Settings for measuring Ohms, Volts, and Amps
To change the setting, rotate the center dial. In the picture, it is set at 200k on the Ω (Ohms) range. This means that the maximum reading for that setting is 200kΩ, or 200,000 ohms. The tables below describe the settings for Volts, Amps and Ohms. The multiplier is done in the meter, and the numbers are displayed with the correct decimal place.
Each setting shows the highest value that can be read on that scale. For example, setting the meter at 20kΩ will allow resistance measurements from 0 Ω to 20,000 Ω. Setting it at 200 allows readings up to 200 Ω. It is generally a good practice to pick the scale that is in the correct range for the device being measured.Ohmmeter Settings.
Probe connections on the meter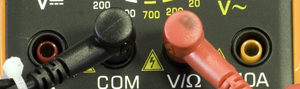
- Black probe connected to COM
- Red probe connected to V/Ω
To select a setting, rotate the selector switch to that setting.
| Setting | Multiplier | Prefix | Largest Reading |
|---|---|---|---|
| 200M | 2,000,000 | M | 200 MΩ (megaohms) |
| 200 | 1 | 200 Ω (ohms) | |
| 2k | 1000 | k | 2 kΩ (kilo ohms) |
| 20k | 1000 | k | 20 kΩ (kilo ohms) |
| 2M | 1,000,000 | M | 2 MΩ (megaohms) |
| 20M | 1,000,000 | M | 20 MΩ (megaohms) |
Table. Meter Readings for Ohms
Resistance readings are not + / - sensitive and the probes can be connected to either end of the device being measured.
DC Voltmeter Settings.
Probe connections on the meter
- Black probe connected to COM
- Red probe connected to V/Ω
To select a voltage setting, rotate the selector switch to that setting.
| Setting | Multiplier | Prefix | Reading |
|---|---|---|---|
| 200m | .001 | m | mV (millivolts) |
| 2 | 1 | V (volts) | |
| 20 | 1 | V (volts) | |
| 200 | 1 | V (volts) | |
| 1000 | 1 | V (volts) | |
| 20M | 1 | V (volts) |
Table. Meter Readings for DC Volts
DC volts are + / - sensitive and connecting them backwards will result in a negative reading on the meter. For example, if the voltage is 12.5 volts, connecting the probes backwards to the voltage source will result in a reading of -12.5 volts.
AC Voltmeter Settings.
Probe connections on the meter
- Black probe connected to COM
- Red probe connected to V/Ω
The following settings are for Alternating Current voltage.
| Setting | Multiplier | Prefix | Reading |
|---|---|---|---|
| 200m | .001 | m | mV (millivolts) |
| 2 | 1 | V (volts) | |
| 20 | 1 | V (volts) | |
| 200 | 1 | V (volts) | |
| 1000 | 1 | V (volts) | |
| 20M | 1 | V (volts) |
Table Meter Readings for AC Volts
AC voltage readings are not + / - sensitive and the probes can be connected to either end of the device being measured.
DC Ammeter Settings for current less than 200mA.
Probe connections on the meter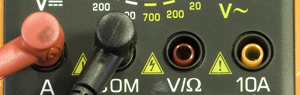
- Black probe connected to COM
- Red probe connected to A. Note that this setting causes the electricity to flow thorough a fuse in the meter. If the current exceeds 200 mA the fuse will blow and that function on the meter will be disabled.
The following settings are for DC current less than 200 mA (milliamps).
| Setting | Multiplier | Prefix | Reading |
|---|---|---|---|
| 2m | 0.001 | m | mA (milliamps) |
| 200m | 0.001 | m | mA (milliamps) |
| 20m/10 | 0.001 | m | mA (milliamps) |
Table. Meter Readings for DC milliamps
The 20m/10 setting is dual purpose. With the probe in the above configuration, the meter reading is 10 milliamps.
DC current is + / - sensitive and connecting them backwards will result in a negative reading on the meter. For example, if the current is 0.015 mA, connecting the probes backwards to the current source will result in a reading of -0.015 mA.
AC Ammeter Settings for current less than 200mA.
Probe connections on the meter
- Black probe connected to COM
- Red probe connected to A. Note that this setting causes the electricity to flow thorough a fuse in the meter. If the current exceeds 200 mA the fuse will blow and that function on the meter will be disabled.
The following settings are for AC current less than 10 A (amps).
| Setting | Multiplier | Prefix | Reading |
|---|---|---|---|
| 2m | 0.001 | m | mA (milliamps) |
| 200m | 0.001 | m | mA (milliamps) |
| 20m/10 | 0.001 | m | mA (milliamps) |
Table. Meter Readings for AC milliamps
The 20m/10 setting is dual purpose. With the probe in the above configuration, the meter reading is 10 milliamps.
AC current is not + / - sensitive and the probes may be connected in any order.
DC Ammeter Settings for current less than 10 A.
Probe connections on the meter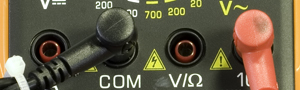
- Black probe connected to COM
- Red probe connected to 10 A.
- Note that this setting is not fused. Great care should be taken to ensure that the meter is not connected to higher current as it can seriously damage the meter.
The following settings are for DC current less than 10 A (amps).
| Setting | Multiplier | Prefix | Reading |
|---|---|---|---|
| 20m/10 | 1 | A (amps) |
Table. Meter Readings for DC amps
The 20m/10 setting is dual purpose. With the probe in the above configuration, the meter reading is 10 amps.
DC current is + / - sensitive and connecting them backwards will result in a negative reading on the meter. For example, if the current is 4.2 A, connecting the probes backwards to the current source will result in a reading of -4.2 A.
AC Ammeter Settings for current less than 10 A.
Probe connections on the meter
- Black probe connected to COM
- Red probe connected to 10 A.
- Note that this setting is not fused. Great care should be taken to ensure that the meter is not connected to higher current as it can seriously damage the meter.
The following settings are for DC current less than 10 A (amps).
| Setting | Multiplier | Prefix | Reading |
|---|---|---|---|
| 20m/10 | 1 | A (amps) |
Table. Meter Readings for DC amps
The 20m/10 setting is dual purpose. With the probe in the above configuration, the meter reading is 10 amps.
AC current is not + / - sensitive, and the probes may be connected in either direction.
When you are ready, move to Your Turn